Want to build your own Bluetooth speaker? It’s easier than you think! This guide shows you how to create a custom speaker that sounds awesome and connects wirelessly, perfect for music lovers who enjoy a fun DIY project.
Hey there, tech explorers! Ever crank up your favorite tunes and wish you had a speaker that was just right? Maybe one that looks cool, sounds amazing, and you built yourself? I totally get it. Sometimes, the speakers you find in stores just don’t hit the spot, or the tech specs can be super confusing. It’s like trying to pick out the perfect gadget in a maze!
But what if I told you that you can create your very own Bluetooth speaker? It’s not as complicated as it sounds, and it’s incredibly rewarding. Imagine showing off a speaker you crafted with your own hands, wirelessly streaming your favorite playlists. It’s a fantastic way to dive into the world of audio and electronics.
We’re going to break down exactly how to make a speaker Bluetooth capable, step by step. No need to be a tech wizard; we’ll keep it simple and fun. You’ll learn about the parts you need, how they all fit together, and how to get that sweet wireless sound. Ready to make some noise? Let’s dive in!

Why Build Your Own Bluetooth Speaker?
Building your own Bluetooth speaker might sound like a big project, but it’s surprisingly achievable and offers some awesome perks. For starters, you get total control over the design and sound quality. You can pick the exact look, the type of sound you prefer, and the size that fits your life.
Plus, it’s a fantastic learning experience. You’ll get hands-on with electronics and understand how speakers really work. It’s way more engaging than just buying one off the shelf. And let’s be honest, there’s a huge sense of accomplishment when you power up something you built yourself. It’s a great conversation starter, too!
Think about it: you can customize it to match your room’s decor, make it portable for picnics, or even build a powerful one for your next party. The possibilities are endless when you’re the designer. It’s your chance to create something truly unique.
What You’ll Need: The DIY Speaker Toolkit
Gathering the right parts is the first big step. Don’t worry, we’ll go through each one. Most of these items are readily available online or at electronics hobby stores. Think of this as your treasure map to building your speaker!
Here’s a breakdown of the essentials:
The Brains and Brawn: Speaker Components
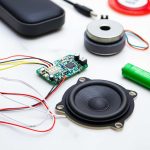
Speaker Driver(s): This is the part that actually makes the sound. You can get full-range drivers (which handle most sounds) or separate woofers (for bass) and tweeters (for treble). For a beginner project, a good full-range driver is often the easiest choice.
Amplifier Module: Your phone or music player sends a small audio signal. The amplifier takes this signal and makes it strong enough to power the speaker driver. Look for small, Class D amplifier boards; they are efficient and don’t produce much heat. Many come with Bluetooth built-in!
Bluetooth Receiver Module: If your amplifier doesn’t have Bluetooth built-in, you’ll need a separate module. This is what lets you connect wirelessly from your phone or tablet.
Power Source: This could be a rechargeable battery pack (like a lithium-ion battery with a charging circuit) or a simple DC power adapter if you want a stationary speaker. For portability, batteries are key!
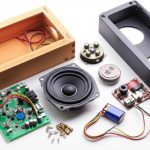
The House: Enclosure Materials
Enclosure Material: This is the box that holds everything. You can use wood (like MDF or plywood), strong cardboard, or even 3D-printed plastic. Wood generally gives the best sound quality because it’s dense and helps reduce vibrations.
Screws and Fasteners: To hold the enclosure together and mount the speaker components.
Wires and Connectors: To connect all the electronic parts.
Tools of the Trade
Soldering Iron and Solder: You’ll need this to make secure electrical connections between the components. Don’t worry if you’ve never soldered before; it’s a skill you can learn quickly!
Wire Strippers/Cutters: For preparing the wires.
Screwdriver Set: For assembling the enclosure.
Drill and Drill Bits: To make holes for speakers, buttons, and wires.
Hot Glue Gun or Strong Adhesive: For securing components and sealing gaps.
Optional: Jigsaw or Saw: If you’re working with wood for the enclosure.
Optional: Multimeter: Helpful for checking connections and power.
Step-by-Step: Bringing Your Bluetooth Speaker to Life
Okay, let’s get our hands dirty and build this thing! We’ll break it down into manageable steps. Remember to take your time and enjoy the process.
Step 1: Designing and Building the Enclosure
This is where your speaker gets its personality. A good enclosure is crucial for sound quality. It should be sturdy and airtight (except for any port you might add for bass).
Plan your size: Consider the size of your speaker driver. It needs enough space to breathe.
Cut your material: If using wood, carefully measure and cut the pieces for the front, back, top, bottom, and sides.
Assemble the box: Use screws and wood glue to assemble the pieces. Make sure it’s snug and strong.
Cut speaker holes: Measure and cut a hole in the front panel for your speaker driver. You might also need holes for a power button, charging port, or volume knob if your module has them.
Pro Tip: A sealed box generally provides tighter bass. If you want a boomier sound, you can research “bass reflex ports” for your enclosure design.
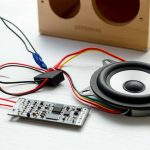
Step 2: Wiring the Electronics
This is the heart of the operation! We’ll connect the power, the Bluetooth module, the amplifier, and the speaker driver. Always double-check your connections before applying power.
Here’s a common wiring setup:
1. Power Source to Amplifier/Bluetooth Module: Connect your battery pack or power adapter to the power input terminals of your amplifier module. Many amplifier boards have a dedicated power input (often marked VCC/VIN and GND).
2. Bluetooth Module to Amplifier (if separate): If your Bluetooth module isn’t integrated into the amplifier, it will usually have output pins (like L_OUT, R_OUT, GND) that connect to the audio input of your amplifier module.
3. Amplifier Output to Speaker Driver: Connect the speaker output terminals of the amplifier (often marked L_OUT+/-, R_OUT+/- or SPK+/-) to the corresponding terminals on your speaker driver. Pay attention to polarity (+ to +, – to -) for best sound.
Important Note: Always refer to the specific wiring diagrams that come with your amplifier and Bluetooth modules. They are your best guide!
Step 3: Installing Components
Now, let’s put everything into the enclosure.
Mount the Speaker Driver: Securely screw the speaker driver into the hole you cut in the front panel.
Place the Electronics: Position your amplifier and Bluetooth module inside the enclosure. You can use hot glue, double-sided tape, or small screws to keep them in place. Make sure they won’t rattle around.
Wire Management: Keep your wires tidy. Use zip ties or tape to bundle them neatly. This makes future troubleshooting easier and prevents shorts.
External Connections: If you have a charging port or a power switch, mount them in the pre-drilled holes on the enclosure.
Step 4: Testing and Troubleshooting
Before you seal everything up, it’s time for the moment of truth!
Power On: Connect your power source. If you have a power switch, turn it on.
Pairing: Your Bluetooth module should become discoverable. Look for its name (often something like “BT-AUDIO” or the module number) on your phone’s Bluetooth settings. Pair with it.
Play Music: Start playing a song from your phone. Listen for sound.
Troubleshooting:
No Sound: Check all your wiring connections. Are they secure? Is the polarity correct? Is the volume up on your phone and the amplifier (if it has a volume control)?
Distorted Sound: The amplifier might be overloaded, or the speaker driver might be too small for the power. Ensure connections are solid.
Bluetooth Won’t Connect: Make sure the Bluetooth module is powered on and in pairing mode. Try restarting both your phone and the speaker module.
Step 5: Finishing Touches
Once you’ve confirmed everything is working, it’s time to make it look amazing.
Seal the Enclosure: If you haven’t already, secure the back panel of your enclosure. Make sure it’s sealed well.
Decorate: Now for the fun part! You can paint the enclosure, cover it with fabric, add stickers, or even carve designs into it. Make it truly yours!
Add Grilles: You might want to add a speaker grille to protect the driver.
Understanding Speaker Specs: What Do They Mean?
When you’re picking out parts, you’ll see a lot of numbers and acronyms. Let’s decode some common ones so you can choose wisely.
Key Speaker Specifications Explained
| Specification | What it Means | Why It Matters |
| :————— | :—————————————————————————- | :——————————————————————————————- |
| Impedance | Electrical resistance (measured in Ohms, Ω). Common values are 4Ω or 8Ω. | Must match your amplifier’s output impedance. Mismatch can damage the amp or speaker. |
| Power Handling | How much power (in Watts, W) the speaker can handle without damage. | Choose a driver that can handle at least the output power of your amplifier. |
| Frequency Response | The range of sound frequencies (in Hertz, Hz) a speaker can reproduce. | Wider range means more detailed sound (e.g., 20Hz-20kHz covers most human hearing). |
| Sensitivity | How loud the speaker gets with a given amount of power (dB/W/m). | Higher sensitivity means the speaker is more efficient and plays louder with less power. |
| Bluetooth Version | The standard for wireless communication (e.g., 4.0, 5.0, 5.1). | Newer versions offer better range, speed, and power efficiency. |
| Amplifier Class | How the amplifier converts power to sound (e.g., Class D is very efficient). | Class D amps are great for battery-powered devices as they use less power and generate less heat. |
Choosing components with compatible specifications is super important. For example, if you have a 10W amplifier, you don’t want a speaker driver rated for only 5W. It’s like trying to push a car with a bicycle engine – it just won’t work well and could cause damage!
Popular Component Combinations for DIY Bluetooth Speakers
To give you a head start, here are a couple of popular setups that work well for DIY projects. These are just examples, and you can find tons of similar modules online.
Example Setup 1: All-in-One Bluetooth Amplifier Board
This is the easiest route for beginners. Many boards combine the Bluetooth receiver and amplifier onto a single chip or small circuit board.
Pros: Simplifies wiring significantly. Often has good power efficiency.
Cons: Less flexibility in choosing separate components.
What to look for: Boards like the TDA7492P or similar modules often come with Bluetooth 4.0 or 5.0 and can power a decent speaker driver.
Typical Specifications:
| Feature | Typical Value | Notes |
| :——————- | :——————————————- | :———————————————- |
| Bluetooth Version | 4.0 or 5.0 | 5.0 offers better range and stability. |
| Power Output | 2x30W, 2x50W, or even higher | Choose based on your speaker driver’s power. |
| Power Input | 12V-24V DC | Ensure your power supply matches. |
| Impedance Compatibility | 4Ω or 8Ω | Check your speaker driver’s impedance. |
| Audio Input | Bluetooth | Some might have an AUX input as a backup. |
Why this works for beginners: You have fewer connections to worry about. Just connect power to the board, and connect the speaker wires from the board to your driver. It’s like plugging and playing, but with a bit of soldering!
Example Setup 2: Separate Bluetooth Receiver and Amplifier
This gives you a bit more control over the sound quality and allows you to use a more powerful amplifier if needed.
Pros: More flexibility in component choice. Can potentially achieve higher fidelity sound.
Cons: Requires more wiring and understanding of signal flow.
What to look for:
Bluetooth Receiver: A simple CSR8645 or similar module.
Amplifier: A Class D amplifier board like the PAM8403 (for low power) or a TPA3116D2 (for higher power).
Typical Specifications (example using PAM8403 amp):
| Feature | Bluetooth Receiver Module | PAM8403 Amplifier Module | Notes |
| :——————- | :———————— | :———————– | :——————————————————– |
| Bluetooth Version | v4.0 or v5.0 | N/A | Connects to your phone. |
| Audio Output | Stereo L/R + GND | Stereo L/R + GND | Connects to the amplifier’s input. |
| Power Input | 5V DC | 5V DC | Can be powered from the same source if managed carefully. |
| Power Output | N/A | 2x3W | Best for small, low-power speakers. |
| Impedance Compatibility | N/A | 4Ω or 8Ω | The PAM8403 is quite forgiving. |
Why this setup is useful: If you want to experiment with different amplifier chips or have a specific Bluetooth module in mind, this setup offers that freedom. You can also add more features like dedicated volume controls more easily.
Making Your Speaker Sound Its Best
Beyond just getting it to work, you can tweak things to improve sound quality. It’s all about the details!
Enclosure is King
We touched on this, but it’s worth repeating. A solid, well-built enclosure is probably the single biggest factor in how good your speaker sounds.
Damping: Adding soft material like polyfill or acoustic foam inside the box can absorb unwanted echoes and resonances, leading to clearer sound. Don’t pack it too tightly, though!
Bracing: For larger wooden enclosures, adding internal braces can prevent the walls from vibrating too much. This is especially helpful for reducing “boomy” bass.
Driver Choice Matters
The speaker driver itself has a huge impact. If you’re serious about sound, consider drivers designed for specific purposes.
Full-Range: Good for simplicity and decent all-around sound.
Component Sets: Using a separate woofer for bass and a tweeter for highs can give you a much richer, more detailed sound profile. This is more complex to wire and requires a crossover network, but the results can be stunning.
Power and Amplification
While you don’t need a super powerful amp for a small DIY speaker, ensuring your amp is a good match for your driver is key.
Matching Power: As mentioned, don’t overpower your driver. It’s better to have a slightly underpowered amp than an overpowered one.
Clean Power: A good quality amplifier module will produce cleaner sound with less distortion, especially at higher volumes.
Tips for a Smooth DIY Bluetooth Speaker Build
Here are some extra nuggets of wisdom to help your project go off without a hitch.
Start Simple: For your first project, stick to a single full-range driver and an all-in-one Bluetooth amplifier board. Master that, then try more complex designs.
Safety First: Always disconnect power before making any wiring changes. If you’re working with batteries, be careful not to short-circuit them.
Double-Check Wiring Diagrams: Seriously, these are your best friends. Every module is slightly different.
Test Before You Seal: Always test your electronics outside the enclosure first to catch any mistakes.
Learn to Solder Well: Good solder joints are essential for reliable connections. Practice on some scrap wire if you’re new to it.
Join Online Communities: Websites like Reddit (r/diysound), Instructables, and various electronics forums are full of helpful people and project ideas.
Frequently Asked Questions About Building a Bluetooth Speaker
Got more questions? Here are some common ones beginners ask.
Q1: Do I need to be an expert in electronics to build this?
Not at all! This guide is designed for beginners. You’ll need basic skills like soldering and using simple tools, but there are plenty of tutorials online for those. The key is to follow instructions carefully.
Q2: How much does it typically cost to build a DIY Bluetooth speaker?
It can vary a lot! For a basic speaker using affordable modules and materials, you might spend between $20 to $50. If you opt for higher-quality drivers, a more robust enclosure, or premium amplifier boards, the cost could go up to $100 or more. It really depends on what you want!
Q3: Can I use an old speaker for my DIY project?
Yes, absolutely! If you have an old, non-working speaker, you can often salvage the speaker driver(s) from it. Just make sure they are still in good condition and check their impedance to ensure they’re compatible with your chosen amplifier.
Q4: What’s the difference between Bluetooth versions (e.g., 4.0 vs. 5.0)?
Newer Bluetooth versions like 5.0 offer significant improvements over older ones. They provide a longer range (up to 4x), faster data transfer speeds, and better power efficiency, which is great for battery-powered devices. You’ll also find improved stability and features like dual audio streaming.
Q5: How do I make my DIY speaker waterproof or water-resistant?
Making a speaker truly waterproof is challenging for DIY projects. However, you can make it water-resistant by using a sealed enclosure, mounting components behind a protective grille, and perhaps sealing any external ports with silicone. For very basic splash resistance, ensure all openings are minimized.
Q6: Can I add volume control to my DIY Bluetooth speaker?
Yes! Many amplifier modules come with built-in volume control knobs. If yours doesn’t, you can often add a separate potentiometer (a type of variable resistor) in line with the audio signal or between the amplifier and the speaker, though this requires more advanced wiring.
Q7: What if my DIY speaker sounds tinny or lacks bass?
This is often due to the enclosure size and design, or the speaker driver itself. Ensure your enclosure is appropriately sized for the driver. Adding acoustic damping material inside can help reduce resonances. If it still lacks bass, you might need a larger driver, a different enclosure design (like a ported box), or a separate woofer.
Conclusion: Your Sound, Your Creation!
And there you have it! You’ve journeyed through the exciting process of making your very own Bluetooth speaker. From understanding the components to wiring them up and bringing your unique design to life, you’ve accomplished something truly awesome.
Building your own tech isn’t just about saving money or getting a custom look; it’s about understanding how things work and gaining confidence in your abilities. You’ve taken raw parts and turned them into a device that brings music and joy into your life. That’s seriously cool!
Don’t stop here. Experiment with different enclosures, try out new speaker drivers, or even build a stereo pair. The world of DIY audio is vast and rewarding.
Now go enjoy amazing sound and make every moment louder and better with your incredible, hand-built Bluetooth speaker! Happy listening!