Ready to experience amazing audio? Connecting your sound box with an optical cable is a straightforward process that delivers superior sound quality. This guide walks you through identifying the ports, making the connection, and optimizing your settings for the best listening experience.
Are you looking to elevate your home entertainment system? Want to ditch that sometimes-fussy Bluetooth connection for something more robust and with potentially better sound quality? Connecting your sound box with an optical cable might be the perfect solution for you. It’s a method that’s been around for a while, but for good reason: it offers a direct digital connection that can deliver incredibly clear and immersive audio. Think crisp dialogue, powerful movie soundtracks, and rich music reproduction.
Many people see that glowing little port on their TV or sound system and wonder, “What is that, and how do I use it?” That’s likely an optical audio port, and it’s your gateway to superior sound. Unlike analog connections that can be prone to interference, optical cables transmit audio signals as pulses of light. This means a cleaner signal, less noise, and ultimately, a more faithful reproduction of the sound. Let’s dive into how you can easily connect your sound box with an optical cable and unlock a whole new world of audio.
- Identify Ports: Locate the optical audio output (often labeled TOSLINK or Digital Audio Out) on your source device and the optical audio input on your sound box.
- Use the Right Cable: Ensure you have a Toslink optical cable, which is distinct from other cable types.
- Gentle Insertion: Carefully insert the optical cable ends into the respective ports, ensuring they click into place.
- Secure Connections: Make sure the cable is firmly seated in both the source and sound box ports to prevent signal loss.
- Select Input: On your sound box, choose the correct input source (usually labeled Optical 1, Optical 2, or Digital In).
- Audio Settings: Verify your source device’s audio output settings are configured for digital or optical output.
- Troubleshooting: If you don’t get sound, recheck cable connections, input selection, and audio settings on both devices.
📑 Table of Contents
Understanding Optical Audio Connections
Before we start plugging things in, it’s helpful to understand what an optical audio connection actually is. At its heart, it’s a way to send digital audio data from one device to another using light. This bypasses the need for analog conversion, which can sometimes degrade the sound quality or introduce hum and buzz.
What is an Optical Audio Cable?
An optical audio cable, also commonly known as a Toslink cable (a portmanteau of Toshiba and Link, as Toshiba pioneered the technology), is made of a plastic or glass fiber. The end connectors are usually square-ish with a small metal shutter that you’ll need to remove before plugging them in. When connected, light pulses are sent through this fiber, carrying the digital audio signal. This is why you’ll often see a red light glowing from the end of the cable or inside the port when it’s in use.
Benefits of Using Optical Cables
Why choose an optical cable over other connection methods? Several advantages make it a popular choice for audio enthusiasts:
- Superior Sound Quality: As mentioned, the digital transmission of light pulses minimizes interference and noise, leading to clearer, more accurate audio.
- Uncompressed Audio Support: Optical cables can carry uncompressed stereo PCM audio and compressed surround sound formats like Dolby Digital and DTS.
- No Electrical Interference: Since the signal is transmitted via light, it’s immune to electromagnetic interference that can affect analog cables.
- Simplicity: Once you identify the ports, the physical connection is very straightforward.
It’s a great way to get the most out of your TV’s sound or to connect your game console directly to a soundbar for an enhanced gaming experience.
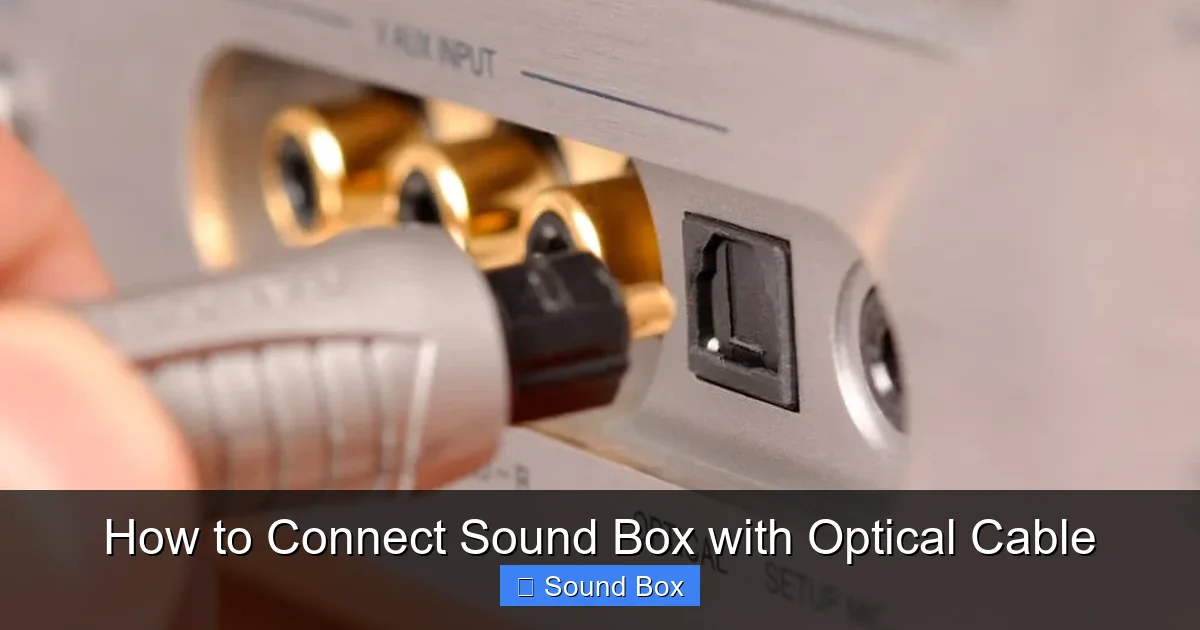
Identifying Your Ports: The First Step

Visual guide about How to Connect Sound Box with Optical Cable
Image source: audiogrounds.com
The crucial first step in connecting your sound box with an optical cable is correctly identifying the necessary ports on both your audio source device (like a TV, Blu-ray player, or game console) and your sound box (like a soundbar or AV receiver).
Locating the Optical Output on Your Source Device
Look at the back or side panel of your TV, Blu-ray player, gaming console, or any other device you want to use as your audio source. You’re searching for a port that is typically:
- Square or rectangular in shape.
- Labeled as “Optical,” “Digital Audio Out,” “TOSLINK,” or sometimes has a small icon that looks like a light beam.
- You might see a small flap or shutter covering the opening.
If your device has multiple optical output ports, note which one you are using. Some devices might label them as “Optical 1” and “Optical 2.”
Locating the Optical Input on Your Sound Box
Similarly, examine your sound box. This could be a soundbar, an AV receiver, or a powered speaker system. You’ll be looking for a port that matches the description above:
- Square or rectangular.
- Labeled as “Optical In,” “Digital Audio In,” “TOSLINK In,” or similar.
- Again, there might be a small shutter.
Just like with the source device, your sound box might have more than one optical input. It’s important to know which one you’ll be connecting to.
Gathering Your Equipment: The Optical Cable
Visual guide about How to Connect Sound Box with Optical Cable
Image source: the-home-cinema-guide.com
With your ports identified, you’ll need the right cable. This isn’t something you can improvise with; you need a dedicated optical audio cable.
Choosing the Right Optical Cable
Make sure you have a **Toslink optical cable**. These cables are specifically designed for digital audio transmission via light. They are not interchangeable with other types of cables like HDMI or coaxial digital cables.
Cable Length and Quality
When choosing an optical cable, consider the length you’ll need to comfortably connect your devices without straining the cable. For most home setups, a cable between 3 to 6 feet (1 to 2 meters) is usually sufficient. While there are very expensive optical cables on the market, for standard home audio, a good quality, mid-range cable will perform perfectly well. You don’t need to break the bank to get excellent sound.
Making the Connection: Step-by-Step

Visual guide about How to Connect Sound Box with Optical Cable
Image source: columbiaisa.50webs.com
Now for the exciting part – actually plugging everything in! It’s a simple process, but taking a moment to do it correctly ensures a solid connection.
Step 1: Prepare the Cable
Take your optical cable out of its packaging. You’ll notice small protective caps or shutters on each end of the connector. Gently remove these. Be careful not to touch the exposed fiber tip, as fingerprints can sometimes interfere with the light signal.
Step 2: Connect to the Source Device
Take one end of the optical cable and align it with the optical output port on your source device (e.g., your TV). The connector has a specific shape, so it should only fit one way. Gently push it into the port until you feel a slight click or a secure seating. Don’t force it.
Step 3: Connect to the Sound Box
Now, take the other end of the optical cable and align it with the optical input port on your sound box. Again, it’s designed to fit only one way. Push it gently until it clicks or feels securely seated.
Step 4: Ensure a Secure Fit
Give each end of the cable a very gentle tug to ensure it’s fully inserted and won’t come loose. A loose connection is a common cause of no sound or intermittent audio.
Configuring Your Devices for Optimal Sound
Simply plugging in the cable isn’t always enough. You need to tell your devices that you want to use the optical audio connection and ensure they are sending the right kind of audio signal.
Setting the Audio Output on Your Source Device
This is a critical step. Your TV or other source device needs to be told to send audio through the optical port. The exact steps vary depending on your device, but generally, you’ll need to:
- Navigate to your device’s settings menu.
- Find the audio or sound settings section.
- Look for an option related to audio output or digital audio out.
- Select “Optical,” “Digital,” or sometimes a specific surround sound format if you know your sound box supports it.
For example, on many TVs, you might find this under “Settings” > “Sound” > “Audio Output” and then choose “Optical.” Some TVs might allow you to select the audio format (PCM, Dolby Digital, etc.) – if you’re unsure, PCM is usually a safe bet for stereo, while Dolby Digital is for surround sound. If you have an HDMI ARC connection, you might need to ensure that’s also set correctly if you’re using it for other purposes. For the best experience with your sound box, consider checking out guides on how to connect your TV to a speaker, as understanding your TV’s audio capabilities is key.
Selecting the Correct Input on Your Sound Box
Your sound box needs to know which of its inputs to listen to. On your sound box’s remote control or on the unit itself, find the input or source button. Cycle through the available inputs until you select the one that corresponds to the optical port you used. This might be labeled as “Optical 1,” “Optical 2,” “Digital In,” or similar. Your sound box’s display should indicate which input is currently active.
Testing the Connection
Once both devices are configured, play some content on your source device. You should hear sound coming from your connected sound box. If you don’t, don’t panic! This is where troubleshooting comes in.
Troubleshooting Common Issues
Even with the best intentions, sometimes things don’t work perfectly on the first try. Here are some common issues and how to fix them when connecting your sound box with an optical cable.
No Sound at All
This is the most frequent problem. Here’s a checklist:
- Double-Check Cable Connections: Ensure both ends of the optical cable are firmly seated and have clicked into place.
- Verify Input Selection: Make sure you’ve selected the correct optical input on your sound box.
- Confirm Source Device Output Settings: Go back to your source device’s audio settings and confirm that the optical output is enabled and set to the correct format.
- Remove Protective Caps: Did you forget to remove the small plastic caps from the cable ends?
- Try a Different Cable: It’s possible, though rare, that the optical cable itself is faulty. If you have another one, try swapping it out.
- Check for Device Muting: Ensure neither the source device nor the sound box is muted.
Intermittent Sound or Dropouts
If the sound cuts in and out, it’s usually a connection issue.
- Secure the Cable: Wiggle the cable ends gently at both the source and the sound box. If the sound changes or returns, the connection is loose. Try re-seating them firmly.
- Cable Routing: Ensure the cable isn’t bent at too sharp an angle or kinked, which can damage the fiber optics.
- Source Device Issues: In rare cases, the source device itself might be having trouble sending a stable signal.
Distorted or Low-Quality Sound
This can sometimes happen if the audio format is incompatible or if the connection isn’t optimal.
- Check Audio Format Settings: On your source device, try switching the audio output format between PCM (for stereo) and Dolby Digital (for surround sound) to see if one works better.
- Clean the Port and Cable Tip: Although not common, a bit of dust can interfere. Gently blow into the port or use a dry cotton swab on the cable tip.
- Cable Quality: While most cables work fine, a very old or damaged cable might degrade the signal.
Beyond the Basics: Advanced Tips
Once you have your optical connection working smoothly, you might want to explore a few advanced tips to further enhance your audio experience.
Understanding Audio Formats
Your source device can usually send audio in different formats.
- PCM (Pulse-Code Modulation): This is uncompressed digital audio, typically used for stereo sound. It’s a good, universally compatible option.
- Dolby Digital: A compressed surround sound format common for 5.1 audio. Your sound box needs to be Dolby Digital compatible to decode this.
- DTS (Digital Theater Systems): Another popular surround sound format. Again, your sound box needs to support DTS.
Experimenting with these settings can sometimes yield better results, especially if you have a surround sound system. If you’re connecting to a basic soundbar that only supports stereo, setting your source to PCM is usually best. For those looking to get the most out of their setup, understanding how to improve sound quality with external speakers is always a good read.
Using Optical with Multiple Devices
If your TV has multiple optical inputs, or your sound box does, you can connect more than one device. For instance, you could connect your TV and a gaming console directly to your sound box via optical. Just remember to switch the input on your sound box accordingly. For those interested in wireless solutions, learning how to connect a Bluetooth speaker to a TV can offer a different kind of flexibility.
When to Consider HDMI ARC
While optical is excellent, many modern TVs and sound systems also support HDMI ARC (Audio Return Channel). If both your TV and sound box have HDMI ARC ports (usually labeled on the HDMI port itself), this can be an even more convenient option. It allows audio to travel both ways over a single HDMI cable, and it can sometimes carry higher bandwidth audio formats than optical. However, optical is still a fantastic and reliable choice, especially for older equipment or when HDMI ARC isn’t available or causing issues. If you’re exploring ways to connect devices, understanding how to connect a TV to a Bluetooth speaker shows the variety of audio connection options available.
Conclusion
Connecting your sound box with an optical cable is a fantastic way to achieve crisp, clear, and robust audio for your home entertainment. By carefully identifying your ports, using the correct Toslink cable, and ensuring your devices are configured properly, you can easily unlock a superior listening experience. Don’t be intimidated by the glowing lights or technical jargon; it’s a straightforward process that can make a significant difference in how you enjoy your movies, music, and games. So, grab your cable, follow these steps, and get ready to hear the difference that a direct digital connection can make!
Frequently Asked Questions
What is the difference between optical and HDMI ARC for audio?
Optical cables transmit audio via light pulses and are great for stereo and compressed surround sound. HDMI ARC, on the other hand, uses a single HDMI cable to send audio back from your TV to your sound system and can support higher bandwidth audio formats and features like CEC control.
Can I use any digital audio cable for optical connections?
No, you must use a specific optical audio cable, also known as a Toslink cable. These cables are made of fiber optics and designed to transmit light signals, unlike coaxial digital cables which use electrical signals.
Do I need to connect a specific optical port on my TV if there are multiple?
Generally, if your TV has multiple optical audio outputs, they will all function the same. However, it’s always best to check your TV’s manual to confirm if there are any specific recommendations or if one port is designated for primary audio out.
My sound box has two optical inputs. How do I know which one to use?
You can use either optical input on your sound box. The key is to make sure you select the corresponding input on your sound box using its remote control or buttons (e.g., if you plug into “Optical 2,” select “Optical 2” as the source on your sound box).
What if my TV only has HDMI outputs and no optical audio out?
If your TV lacks an optical audio output, you might need an HDMI audio extractor. This device can take an HDMI signal and split it, providing separate audio outputs (including optical) while passing the video through to your display. You might also look into Bluetooth options if your sound box supports it, such as how to connect your iPhone to a speaker via Bluetooth.
Is it safe to remove the protective caps from the optical cable?
Yes, it is necessary to remove the protective caps or shutters from the ends of the optical cable before plugging them in. These are there to protect the fiber optic connector during storage and transport. Be careful not to touch the exposed fiber tip with your fingers, as oils and dirt can degrade the signal quality.


