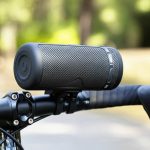
Mount your Bluetooth speaker to your hiking pole for music on the go! This easy hack means no more dropped speakers or tangled wires, just your favorite tunes as you explore the trails.
Hey there, tech adventurers! Ever been out on a hike, breathing in that fresh air, and wished you had some music to go with the stunning views? I know I have! Music just makes everything better, right? Whether it’s your favorite upbeat playlist to power you up a steep climb or some chill tunes for a scenic break, sound can really elevate an outdoor experience.
But let’s be honest, juggling your phone, water bottle, and a speaker can be a bit of a mission. And the thought of dropping your beloved speaker on a rocky path? No thanks! That’s where I come in. I’m Max Donovan, your go-to tech buddy from AffTechy.com, and I’m here to make technology simple and fun.
I know picking out gadgets can sometimes feel overwhelming. So many specs, so many choices! But don’t worry, we’ll break it all down. Today, we’re tackling a super cool, practical hack that’s perfect for any outdoor lover. We’re talking about how to securely mount your Bluetooth speaker to your hiking pole. It’s a game-changer for enjoying your adventures with a soundtrack.

This isn’t complicated stuff, I promise! We’ll go through it step-by-step. Get ready to make your next hike a whole lot more musical and a lot less hassle. Let’s get started!
Why Mount Your Speaker on a Hiking Pole?
Think about it. You’re hiking, your hands are busy gripping your trekking poles for balance and support. Where do you put your speaker? In your backpack? That means stopping every time you want to change a song or adjust the volume. In your pocket? Risky, and the sound will be muffled.
Mounting your Bluetooth speaker directly onto your hiking pole is pure genius for a few reasons. It keeps your speaker safe, easily accessible, and lets you share your music with your hiking buddies (if they’re into it, of course!). Plus, it frees up your hands and your pockets for essentials.
This hack is perfect for anyone who loves a good tune and a good walk. It’s a simple solution that makes a big difference. You get the benefits of hands-free music and protected gear, all while enjoying the great outdoors.

What Kind of Bluetooth Speaker Works Best?
Not all Bluetooth speakers are created equal, especially when you’re thinking about strapping them to a pole. Here’s what to look for:
Size and Shape: Smaller, cylindrical speakers are usually the easiest to mount. Think of speakers that are roughly the same diameter as your hiking pole. Some speakers have a flat side or a built-in loop, which can also be helpful.
Durability: You’re going to be outdoors, so a speaker that can handle a little bit of rough and tumble is a plus. Look for water-resistant (IPX rating is your friend here!) and dustproof models.
Battery Life: Long hikes mean you need long-lasting tunes. Check the battery life specs to ensure your speaker can keep the party going for your entire adventure.
Sound Quality: While portability is key, you still want decent sound. Read reviews to see how well it performs outdoors. A speaker that’s too quiet will get lost in the wind.
Here’s a quick look at some popular speaker types that tend to work well for this hack:
| Speaker Type | Pros for Mounting | Cons for Mounting |
|---|---|---|
| Cylindrical Portable Speakers (e.g., JBL Flip, UE Boom) | Easy to grip with straps or mounts. Good sound for their size. Often water-resistant. | Can be a bit bulky if you have very slim poles. |
| Small, Clip-On Speakers (e.g., JBL Clip) | Designed for portability with built-in carabiners. Very lightweight. | Sound quality might be less powerful. May not fit all pole shapes securely without extra padding. |
| Larger, Bullet-Shaped Speakers | Can offer richer sound. Some have mounting points. | Heavier and bulkier. May unbalance your pole if not mounted carefully. |
See? It’s not just about picking the cheapest or the smallest. It’s about finding a speaker that fits your hiking style and your gear. The cylindrical ones are often the sweet spot for this particular hack.
The “Genius Hack”: Mounting Your Speaker
Okay, let’s get to the good stuff! How do we actually attach this thing to your pole? There are a few ways to do it, and the best method depends on your speaker and your pole.
Method 1: The Simple Strap and Zip Tie Combo
This is my favorite because it’s super secure and uses items you might already have around the house or can grab easily.
What You’ll Need:
Your Bluetooth speaker
A sturdy Velcro strap (like those used for organizing cables or bike accessories)
A couple of heavy-duty zip ties
Steps:
1. Position the Speaker: Decide where on your hiking pole you want to mount the speaker. Most people find it comfortable on the upper section, just below the handle, so it doesn’t get in the way of your grip.
2. Loop the Strap: Wrap the Velcro strap around the body of the speaker and the hiking pole. Make sure it’s snug. If your speaker has a loop or a handle, this is a great place to thread the strap through for extra stability.
3. Add Zip Ties for Security: This is the crucial step for making it really secure. Thread one or two heavy-duty zip ties over the Velcro strap and around the pole. Cinch them down tight. The zip ties will prevent the Velcro from loosening on its own, especially with movement.
4. Trim Excess: Once the zip ties are tight, snip off the excess plastic.
5. Test It Out: Give the speaker a gentle tug. It should feel solid and not move around. You can also test it by walking around a bit before you hit the trail.
Why this works: The Velcro strap provides a good grip and allows for some adjustability. The zip ties act as a lock, ensuring that the strap stays put no matter how much you move or bounce. It’s a really strong connection!
Method 2: Using a Dedicated Speaker Mount
If you want something a bit more polished or your speaker is an odd shape, a dedicated mount might be for you.
What You’ll Need:
Your Bluetooth speaker
A universal speaker mount or a bike handlebar mount that can attach to poles. Many of these have adjustable clamps.
Optional: Some extra padding (like a bit of foam or a rubber band) if the clamp is a bit loose.
Steps:
1. Attach the Mount to the Pole: Most universal mounts have an adjustable clamp. Open it up and fit it around your hiking pole at your desired location. Tighten the clamp securely.
2. Attach the Speaker to the Mount: These mounts usually have a strap, clip, or cradle to hold the speaker. Secure your speaker into the mount according to the mount’s instructions.
3. Add Padding (If Needed): If the clamp is too big for your pole, or the speaker feels wobbly in its cradle, add a layer of foam, a thick rubber band, or even a strip of cloth around the pole or inside the cradle. This helps create a tighter, more secure fit.
4. Check for Stability: Ensure the speaker is held firmly and doesn’t rattle or slip.
Where to find these: You can often find these on Amazon or at outdoor gear stores. Search for “universal speaker mount for bike handlebars” or “portable speaker holder.”
Method 3: The DIY Water Bottle Cage Hack
Got a speaker that’s a bit larger or has a flat side? You might be able to adapt a water bottle cage.
What You’ll Need:
Your Bluetooth speaker
A flexible water bottle cage (metal ones can be bent, but plastic ones might be easier to work with)
Strong zip ties or bungee cords
Steps:
1. Position the Cage: Attach the water bottle cage to your hiking pole. You might need to get creative here. Some poles have pre-drilled holes, or you can use zip ties to secure the cage itself to the pole.
2. Secure the Speaker: Place your speaker inside the cage. It might be a snug fit, which is good!
3. Add Extra Securing: Use zip ties or bungee cords to wrap around the speaker and the cage, ensuring it won’t fall out. This is especially important if the cage isn’t a perfect fit.
A Little Extra Tip: If your speaker has a built-in loop or handle, this makes it much easier to secure with any of these methods. Always use it if you can!
Keeping Your Gear Safe and Sound: Extra Tips
Mounting is great, but here are a few more things to think about to keep your speaker happy on the trail.
Protect from the Elements: Even water-resistant speakers can be damaged by heavy rain or submersion. Consider a small dry bag or a waterproof cover for your speaker if you’re hiking in wet conditions.
Volume Control: Be mindful of others on the trail. While it’s fun to have music, it’s important to be respectful of fellow hikers and nature. Keep the volume at a level that doesn’t disturb wildlife or other people.
Battery Management: Before you head out, make sure your speaker is fully charged. You might even want to bring a portable power bank if you’re going on a multi-day trip.
Check Regularly: During your hike, give your speaker mount a quick check every now and then. Make sure everything is still tight and secure.
Speaker Placement Matters: Think about how the sound will project. Mounting it higher on the pole might give you better sound distribution.
Quick Speaker Maintenance Checklist
Charge Fully: Always start with a full battery.
Clean Gently: Wipe down your speaker with a dry or slightly damp cloth after dusty hikes.
Check for Damage: Inspect the speaker and its charging port for any debris or damage.
Update Firmware: Occasionally, check if there are any software updates for your speaker. This can improve performance and battery life.
Comparing Speaker Features for Hiking
Choosing the right speaker involves looking at specific features. Here’s a breakdown of what’s important for hiking and how different features stack up.
| Feature | Importance for Hiking | What to Look For | Example Specs (Good) |
| :—————- | :——————– | :———————————————————————————- | :————————– |
| Water Resistance | High | IPX rating. IPX7 means it can be submerged for 30 mins in 1m of water. IPX5 is splash-proof. | IPX7 or IPX6 |
| Dustproof | Medium-High | Often included with IPX ratings (e.g., IP6X means dustproof). | IP67 or IP6X |
| Battery Life | High | Advertised playback time. Look for 10+ hours for longer hikes. | 15-20 hours |
| Portability | High | Size, weight, and shape. Cylindrical or with a clip/strap is best. | Under 1 lb, 6-8 inches tall |
| Durability | High | Rugged design, rubberized coatings, shock resistance. | Drop-tested, rugged build |
| Sound Output | Medium | Watts (W) for power. Consider if you’ll be hiking solo or with a group. | 10W-20W for good volume |
| Connectivity | High | Bluetooth version (5.0+ is good for range and stability). | Bluetooth 5.0 or higher |
Understanding these specs helps you make a smart choice. For example, a speaker with an IPX7 rating is great because even if you accidentally drop it in a puddle or it gets caught in a downpour, it should be fine. And a battery life of 15 hours means you’re covered for most day hikes and even some overnight trips without needing to recharge.
Popular Hiking-Friendly Speakers & Their Mountability
Let’s look at a couple of popular speaker models and how they might fare with our mounting hacks. These are just examples, and many other great speakers are out there!
Example 1: JBL Flip Series
Mountability: Excellent. The cylindrical shape and fabric loop make it easy to secure with straps and zip ties.
Hiking Features: Good water resistance (IPX7), decent battery life (around 12 hours), durable design.
Sound: Packs a punch for its size, great for personal listening or a small group.
Example 2: Ultimate Ears (UE) Boom Series
Mountability: Very Good. Similar to the JBL Flip, its shape and integrated loop are ideal for strap-based mounting.
Hiking Features: High water and dust resistance (IP67), long battery life (up to 15 hours), very rugged build.
Sound: Known for its 360-degree sound, which is great for sharing music outdoors.
Example 3: Anker Soundcore (e.g., 2 or 3)
Mountability: Good. Many are cylindrical and can be secured with straps. Some might have a small handle or loop.
Hiking Features: Often offer good water resistance (IPX7), impressive battery life (20+ hours on some models), and are very budget-friendly.
Sound: Generally good sound quality for the price.
Example 4: Sony (e.g., SRS-XB13)
Mountability: Good. Compact and often has a detachable strap that can be used with a pole.
Hiking Features: Water and dustproof (IP67), surprisingly good sound for its tiny size, long battery life (around 16 hours).
Sound: Clear and balanced, though less bass-heavy than larger speakers.
As you can see, many modern portable Bluetooth speakers are designed with outdoor use in mind. This makes our mounting hack even easier to implement. It’s all about finding that sweet spot between features, price, and how well it fits your specific hiking pole.
Frequently Asked Questions (FAQs)
Got more questions about mounting your Bluetooth speaker? Here are some quick answers!
Q1: Will mounting my speaker make my hiking pole unstable?
A1: Not if you mount it securely! The key is to use strong straps and zip ties, or a dedicated mount, to ensure it’s snug. A well-mounted speaker shouldn’t affect your balance.
Q2: Can I use any kind of strap?
A2: For the best results, use sturdy Velcro straps or zip ties. Thin, flimsy straps might not hold well. If your speaker has a built-in lanyard loop, that’s a fantastic anchor point!
Q3: What if my speaker is heavy?
A3: If you have a heavier speaker, it’s even more important to use multiple securing points, like two zip ties or a combination of straps and zip ties. Distribute the weight as evenly as possible on the pole.
Q4: Will the music be too loud for other hikers?
A4: It’s important to be considerate. Always adjust your volume to a level that’s enjoyable for you and your group but doesn’t disrupt others or wildlife. You can always turn it down when passing others.
Q5: What if it rains heavily?
A5: If your speaker is only splash-proof (IPX5), you might want to put it in a small waterproof pouch or bag before mounting it, just to be safe. Speakers with IPX7 or IP67 ratings are much more resilient to water and dust.
Q6: How do I detach the speaker when I’m done hiking?
A6: If you used zip ties, you’ll need to snip them. If you used Velcro straps, they should be easy to unfasten. Dedicated mounts usually have quick-release mechanisms.
Q7: Can I mount it on any type of hiking pole?
A7: Generally, yes! Whether you have carbon fiber, aluminum, or wood poles, these mounting methods should work. Just ensure the clamp or strap has a good grip on the pole’s diameter.
Wrapping Up Your Musical Adventure
There you have it! Mounting your Bluetooth speaker on your hiking pole is a fantastic, simple hack that brings your favorite tunes along for the ride without any fuss. We’ve covered why it’s a great idea, what kind of speakers work best, and the best ways to secure them.
You learned about the super-effective strap and zip tie method, the convenience of dedicated mounts, and even a DIY water bottle cage trick. Plus, we’ve highlighted important features to look for in a hiking speaker and shared some quick maintenance tips.
Don’t let tangled wires or fear of dropping your gear stop you from enjoying music on your adventures. This hack is easy to do, affordable, and makes a huge difference to your hiking experience. It’s all about making technology work for you, so you can focus on enjoying nature.
So, go ahead, grab your speaker, your pole, and the few simple items needed for the hack. Try it out, and get ready to elevate your next trek. Now go enjoy amazing sound and make every moment louder and better! Happy trails and happy listening!