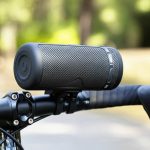
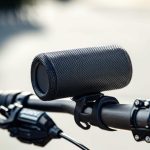
Secure your sound! This guide shows you easy, no-fail ways to attach your Bluetooth speaker to your bike, so your tunes stay with you on every ride.
Hey there, tech adventurers! Ever been on a bike ride, wishing you had your favorite playlist pumping through the air? Or maybe you just want to share a podcast with your riding buddy. Music just makes everything better, right? But then comes the tricky part: how do you actually get that awesome Bluetooth speaker onto your bike without it falling off? It can feel like a puzzle, and nobody wants to deal with complicated setups when all you want is to enjoy the ride.
That’s where I come in! I’m Max Donovan, your friendly guide to making tech simple and fun. Think of me as that buddy who loves gadgets and can explain them without making your head spin. We’ll cut through all the jargon and get straight to what matters. Today, we’re tackling a super common problem: attaching your Bluetooth speaker securely to your bike. Forget those shaky mounts or worrying about your speaker going for a solo adventure. We’re going to make sure your sound stays put, no matter the bumps or turns.
So, grab your helmet and let’s dive in! We’ll explore the best ways to get your music rolling with you, making every bike trip a concert on wheels. Ready to make your rides a whole lot more musical? Let’s break it down step by step!
Why You Want Tunes on Your Two-Wheeler
Riding a bike can be an amazing experience. It’s great for your health, it’s good for the planet, and it lets you explore your surroundings in a whole new way. Adding music or podcasts can seriously level up that experience. Imagine cruising down a scenic path with your favorite upbeat playlist setting the pace, or listening to an interesting story on your commute. It turns a simple ride into an adventure.
But let’s be real, nobody wants to hold their speaker the whole time. And even worse, nobody wants to see their precious speaker bouncing down the road! Finding a way to attach it safely is key. You want it secure, out of the way, and easy to access if you need to change a song. We’re talking about making your bike not just a way to get around, but a portable sound system for your journeys.
Choosing Your Bike-Friendly Speaker
Before we talk about attaching, let’s quickly touch on the speaker itself. Not all Bluetooth speakers are created equal for bike duty. Some are super tiny and light, while others are a bit bulkier. You’ll also find speakers that are water-resistant or even waterproof, which is a huge plus for unpredictable weather.
Think about the size and weight of your speaker. A massive speaker might be too heavy for some mounting systems. Also, consider how you’ll use it. If you ride in the rain a lot, a speaker with a good IP rating (that’s the water and dust protection rating) is a must.
What to Look for in a Bike Speaker
Size and Weight: Smaller, lighter speakers are generally easier to mount securely.
Durability: Look for speakers with sturdy casings that can handle a few bumps.
Water Resistance (IP Rating): Essential if you ride in damp conditions or might encounter rain. An IPX4 rating means it can handle splashes, while higher ratings offer more protection.
Sound Quality: Of course, you want it to sound good! But for outdoor riding, you might prioritize volume and clarity over deep bass.
Battery Life: A longer battery life means fewer worries about your music cutting out mid-ride.
The Big Question: How to Attach It Securely?
Alright, let’s get to the good stuff! How do we get that speaker attached so it stays put? There are a few super effective methods. We’ll cover some DIY hacks and some clever gadgets you can buy. The goal is always security and ease.
Method 1: The Zip Tie & Velcro Strap Combo (DIY Hero!)
This is a classic for a reason. It’s cheap, it’s effective, and you probably already have the materials. It’s perfect for speakers that have a loop or a handle.
Here’s what you’ll need:
Strong zip ties (heavy-duty ones are best)
A sturdy Velcro strap (the kind used for organizing cables or securing luggage works great)
Your Bluetooth speaker
Your bike (obviously!)
Let’s get it done:
1. Find the Perfect Spot: Look at your handlebars or frame. You want a spot that’s secure and won’t interfere with your steering or braking. The handlebars are usually the easiest.
2. Loop the Zip Ties: Take a couple of strong zip ties and thread them through any loops or openings on your speaker. If your speaker has a handle, this is ideal.
3. Position the Speaker: Place your speaker where you want it on the handlebars. Make sure it’s not blocking any important controls.
4. Secure with Zip Ties: Wrap the zip ties around a part of your handlebar. Don’t tighten them all the way just yet. You want to be able to adjust the position.
5. Add the Velcro Strap: Now, take your Velcro strap. Loop it around the speaker and the handlebar as well. This adds a crucial layer of security and helps absorb vibrations.
6. Tighten Everything Up: Once you’re happy with the placement, start tightening the zip ties. Pull them as snug as you can. Then, cinch down the Velcro strap. You want it firm, but not so tight that you’re damaging the speaker or the bike.
7. Trim the Excess: Snip off any extra length from the zip ties so they don’t snag on anything.
Why this works: The zip ties provide a strong anchor, while the Velcro strap adds flexibility and extra grip. It’s a double layer of protection that keeps your speaker from rattling loose.
Method 2: Dedicated Bluetooth Speaker Mounts
If you want something a bit more purpose-built, there are some great mounts designed specifically for speakers. These often offer a cleaner look and more adjustable options.
Types of Speaker Mounts:
Handlebar Clamps: These are like mini-vise grips that attach to your handlebars and have a platform or cradle for your speaker.
Adjustable Straps: Some mounts use heavy-duty elastic or webbing straps that wrap around the speaker and attach to the handlebars.
Universal Mounts: These are designed to fit a wide range of speaker sizes and shapes.
How to use them (generally):
1. Assemble the Mount: Follow the instructions that come with your specific mount. This usually involves attaching a clamp to a base.
2. Attach to Bike: Secure the clamp part of the mount to your handlebars. Make sure it’s tightened firmly.
3. Place Your Speaker: Position your speaker in the cradle or against the platform of the mount.
4. Secure the Speaker: Use the mount’s built-in straps, clips, or tightening mechanisms to hold your speaker in place.
5. Test for Stability: Give your speaker a gentle wiggle. It should feel completely solid.
Pro Tip: Look for mounts that have some padding or rubberized grips. This helps prevent scratches on your speaker and bike, and it also dampens vibrations for clearer sound.
Method 3: The “Water Bottle Cage” Hack (For Specific Speakers)
Some Bluetooth speakers are designed with a cylindrical shape, similar to a water bottle. If your speaker fits this profile, you might be able to use a standard water bottle cage!
What you’ll need:
A water bottle cage (metal ones are sturdier)
Your cylindrical Bluetooth speaker
Possibly some extra padding (like foam tape or a thick rubber band)
How to do it:
1. Find a Cage Mount: Most bike frames have two holes for water bottle cages. If yours doesn’t, you might need a special clamp that attaches to your handlebars or seat post to hold a cage.
2. Test the Fit: Gently try to place your speaker into the water bottle cage. Does it fit snugly?
3. Add Padding (If Needed): If the speaker is a bit loose, wrap some foam tape or a few thick rubber bands around the speaker where it contacts the cage. This creates a tighter grip and prevents rattling.
4. Insert Speaker: Place the speaker into the cage. It should feel secure and not wobble too much.
5. Ride Test: Go for a short, gentle ride to see how it holds up.
A word of caution: This method works best for speakers that are specifically shaped like bottles and fit very snugly. If it feels loose, it’s probably not secure enough for this method. You don’t want your speaker flying out!
Method 4: DIY Speaker Pouch with Straps
If your speaker is an odd shape or you just want a custom fit, you can make your own little pouch!
What you’ll need:
Durable fabric (like canvas, denim, or neoprene)
Strong thread and a sewing machine (or needle and thread)
Velcro straps or sturdy buckles
Your speaker
How to make it:
1. Measure Your Speaker: Measure the length, width, and height of your speaker.
2. Cut Fabric: Cut two pieces of fabric for the front and back, and one long strip for the sides. Add a little extra for seams.
3. Sew the Pouch: Sew the pieces together to create a snug pouch for your speaker. Leave one end open.
4. Add Straps/Buckles: Sew strong Velcro straps or buckles onto the open end of the pouch. These will be used to secure the pouch to your handlebars or frame.
5. Attach to Bike: Place your speaker inside the pouch, close the open end, and then use the straps or buckles to attach the whole thing securely to your bike.
This method offers a truly custom fit and can protect your speaker as well!
Testing and Safety First!
No matter which method you choose, always test your setup before a long ride.
Wiggle Test: After attaching, give your speaker a good shake and wiggle. Does it feel solid? Is there any movement?
Short Ride Test: Take a short, gentle ride around your block or in a safe area. Listen for any rattling or strange noises. Check the speaker’s position periodically.
Brake and Turn Test: Make sure the speaker doesn’t interfere with your braking or steering. It should be safely out of the way.
Important Safety Note: While it’s fun to have music, always be aware of your surroundings. Loud music can make it harder to hear traffic, other cyclists, or pedestrians. Adjust your volume accordingly, and consider using only one earbud if you’re using headphones for added safety. Many people find a moderate volume with a bike-mounted speaker to be a good balance.
Quick Comparison: Mounts vs. DIY
Let’s look at a quick comparison to help you decide.
| Feature | Dedicated Mounts | Zip Tie/Velcro Combo | Water Bottle Cage Hack | DIY Pouch |
| :————— | :————————————————- | :————————————————— | :——————————————- | :——————————————— |
| Ease of Use | Generally easy, follows instructions. | Quick and straightforward. | Simple if speaker fits. | Requires some crafting skill. |
| Cost | Moderate to High ($15 – $40+) | Very Low (a few dollars) | Low (cost of cage, ~$5-$15) | Low to Moderate (fabric, thread, ~$5-$20) |
| Security | Very High (if properly tightened) | High (when done correctly) | Moderate (speaker-dependent) | High (with good stitching and straps) |
| Versatility | Designed for speakers, often adjustable. | Works for many items with loops/handles. | Limited to cylindrical speakers. | Custom fit for any speaker. |
| Aesthetics | Often sleek and designed for bikes. | Can look a bit “hacky” but functional. | Can look like a water bottle, neat. | Can be very neat and custom. |
| Protection | Varies by mount design. | Minimal speaker protection. | Minimal speaker protection. | Good protection if made well. |
What does this table mean for you? If you want a super secure and professional-looking setup, a dedicated mount is probably your best bet. For a budget-friendly and effective solution, the zip tie and Velcro combo is a winner. The water bottle cage hack is cool if your speaker happens to be the perfect shape, and a DIY pouch is great if you like to get crafty and want a perfect fit.
Fun Facts About Bike Audio
Did you know that the idea of bringing sound along for a ride isn’t entirely new? Early portable music players, like boomboxes, were sometimes strapped to bikes and carts in the 80s and 90s! Of course, Bluetooth technology makes it so much easier and less bulky today.
Also, consider the impact of sound on your ride. Studies have shown that listening to music can actually help some people push harder and feel less fatigued. It can make those longer rides feel shorter and more enjoyable. Just remember to keep that volume at a safe level!
Maintaining Your Bike Speaker Setup
Once your speaker is attached, a little care goes a long way.
Check Regularly: Before each ride, give your speaker mount a quick check. Make sure everything is still tight.
Clean the Mount: Dust and dirt can build up. Wipe down your mount and straps occasionally.
Protect from Elements: If you’re not using a waterproof speaker, take it off the bike when you’re done riding, especially if rain is expected.
Tighten as Needed: Vibrations can loosen things over time. Don’t be afraid to re-tighten zip ties or straps.
Frequently Asked Questions (FAQ)
Q1: Can I really attach any Bluetooth speaker to my bike?
Generally, yes! Most standard-sized Bluetooth speakers can be attached using one of the methods we discussed. Very large or unusually shaped speakers might be trickier, but a DIY pouch or a very robust mount could still work.
Q2: How do I stop my speaker from rattling?
Rattling usually happens because the speaker isn’t held tightly enough or there’s too much vibration. Using extra padding (like foam tape), tighter straps, or a mount with good shock absorption can help prevent rattling. Ensuring zip ties are very snug is also key.
Q3: Is it safe to have music playing while cycling?
It can be, but you need to be cautious. Always keep the volume at a level where you can still hear important sounds like traffic, sirens, or other people. Many cyclists prefer to use only one earbud or keep the speaker volume moderate so they remain aware of their surroundings. Always prioritize safety over sound!
Q4: What’s the best way to attach a small, light speaker?
For small, light speakers, the zip tie and Velcro strap method is often perfect. You can also find smaller, universal bike mounts designed for action cameras or phones that might work well for a compact speaker.
Q5: Will attaching a speaker damage my bike?
If done carefully, it shouldn’t. Using padding where the mount or straps contact your bike can prevent scratches. Avoid overtightening any straps or clamps to the point where they could dent or warp your handlebars or frame.
Q6: What is an IP rating and why is it important for bike speakers?
An IP rating (Ingress Protection) tells you how well a device is protected against dust and water. For a bike speaker, a good IP rating (like IPX4 or higher) means it can handle splashes from rain, puddles, or sweat without getting damaged. This is super important for outdoor use. You can learn more about IP ratings on sites like CNET.
Q7: Where is the best place on my bike to attach a speaker?
The handlebars are usually the most popular and easiest spot. They offer good visibility and are easy to reach. Some people also attach speakers to their frame, but this can sometimes make the sound less direct.
Ready to Roll with Your Sound!
There you have it! Attaching your Bluetooth speaker to your bike doesn’t have to be complicated. We’ve covered everything from quick DIY hacks using zip ties and Velcro to more specialized mounts and even a clever water bottle cage trick. You’ve got the knowledge to make your bike a mobile concert hall or a personal podcast booth.
Remember, the key is security and making sure your setup is stable. Always test your attachment before you head out for a long ride, and keep safety in mind by being aware of your surroundings. Whether you’re commuting, training, or just out for a leisurely cruise, adding your favorite tunes can make the journey so much more enjoyable.
So go ahead, try out one of these methods, and make your next bike ride sound amazing! Now go enjoy amazing sound and make every moment louder and better!