Want to sing along to your favorite tunes in the shower? Mounting a Bluetooth speaker is super easy! This guide shows you simple, safe ways to attach your speaker so you can enjoy music, podcasts, or audiobooks while you wash up, no fuss.
Hey there, tech adventurer! Max here from AffTechy.com. You know, sometimes the simplest ideas make life so much better. Like, who doesn’t love a good shower song? It turns a regular scrub into a mini concert. But then comes the question: how do you get your awesome Bluetooth speaker in there without it getting soaked or falling?
I get it. Picking the right tech can feel like a puzzle. You see all these numbers and features, and your head starts to spin. But don’t worry! My mission is to make tech easy and fun for everyone. We’re going to dive into how you can safely and easily mount your Bluetooth speaker in your shower.
Think of it like this: we’re not building a rocket ship, just making your shower time a little more epic. Ready to make your bathroom the coolest spot in the house? Let’s break it down step by step.
Why You Need a Shower Speaker (Besides Singing Loudly!)
Let’s be honest, a shower can be a bit… quiet. Sometimes it’s just the sound of the water. But imagine this: your favorite upbeat playlist starts pumping. Suddenly, you’re energized and ready for the day. Or maybe you’re unwinding with a calming podcast after a long day. It’s a small change that makes a big difference.
A good shower speaker can really transform your routine. It’s not just about music, though. You can catch up on news, listen to an audiobook, or even take hands-free calls if your speaker has that feature. It’s like giving yourself a little luxury treat every day without spending a dime extra.
The biggest challenge, though, is keeping your speaker safe. Water and electronics usually don’t play well together. That’s where mounting comes in. We need a way to keep it secure, out of direct water spray, and at a good listening level. Don’t worry, it’s easier than you think!
Choosing Your Shower-Ready Speaker
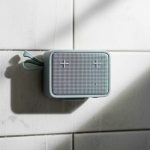
Before we talk about mounting, let’s chat about the speaker itself. Not all Bluetooth speakers are built for the bathroom. The shower is a steamy, wet place! So, the first step is picking a speaker that can handle it. Look for these key things:
- Water Resistance (IP Rating): This is the most important feature. You’ll see ratings like IPX4, IPX5, or even IPX7. The ‘X’ means it’s not tested for dust, but the number after it tells you about water protection.
- IPX4: Protects against splashes from any direction. Good for a general splash-proof speaker.
- IPX5: Protects against low-pressure water jets. Better for potential direct splashes.
- IPX7: Can be submerged in water up to 1 meter for 30 minutes. This is the best for shower use!
- Suction Cups: Some speakers are designed with strong suction cups already attached. This is a super easy mounting solution.
- Compact Size: Smaller speakers are easier to place and less likely to get in the way.
- Good Battery Life: You don’t want your music to die halfway through your shower!
Many brands make speakers specifically for outdoor or shower use. These are usually tougher and have those all-important water resistance ratings. Think about how loud you like your music, too. Some small speakers are powerful, while others are more for background listening.
Here’s a quick look at some popular types of water-resistant speakers you might consider:
| Speaker Type | Typical IP Rating | Best For | Mounting Ease |
|---|---|---|---|
| Basic Splash-Proof Speaker | IPX4 – IPX5 | General bathroom use, light splashes. | Needs separate mounting. |
| Shower-Specific Speaker | IPX5 – IPX7 | Direct splashes, steamy environments. | Often has built-in suction cups or is designed for easy attachment. |
| Rugged Outdoor Speaker | IP67 (dust and water) | Anywhere, including very wet conditions. Very durable. | May require a separate mount, but robust enough for most methods. |
As you can see, aiming for at least an IPX5 rating is a good start for shower use. If you can find an IPX7 speaker, even better! This gives you peace of mind that a little extra water won’t hurt it. Now, let’s get to the fun part: how to actually get it mounted!
Mounting Your Bluetooth Speaker: Easy Fixes
Alright, you’ve got your shower-friendly speaker. Now, where does it go? You want it close enough to hear clearly, but far enough away from the direct spray of the showerhead. Safety first, remember!
Here are some super simple ways to mount your speaker:
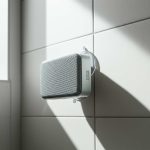
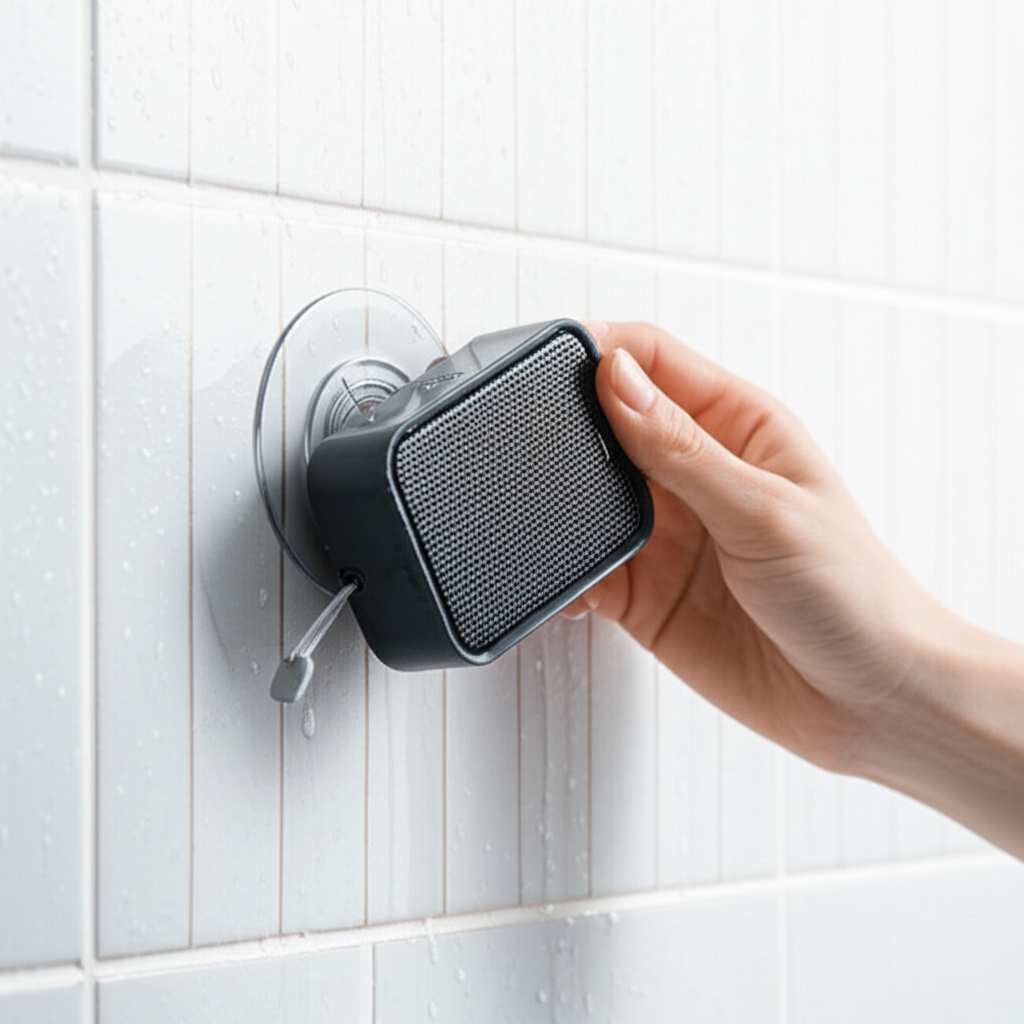
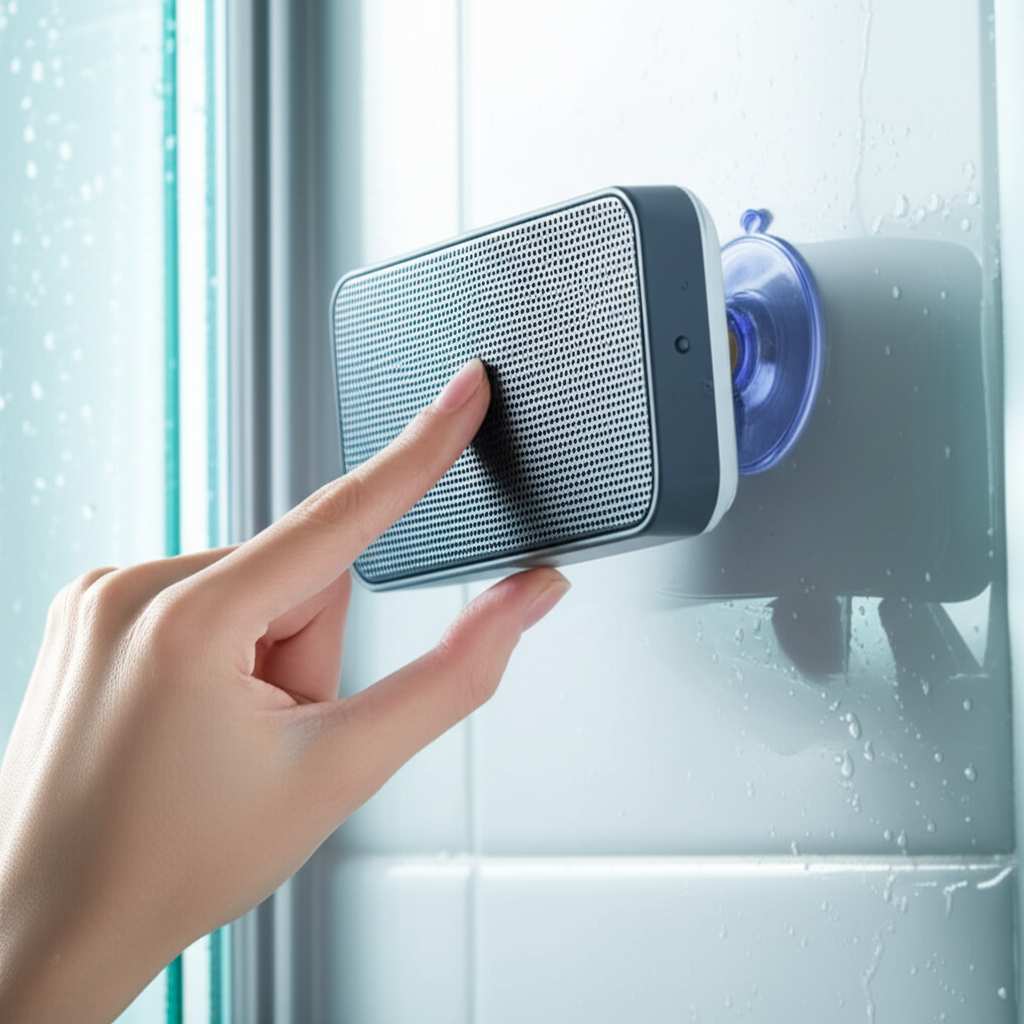
Method 1: The Mighty Suction Cup
This is probably the easiest and most popular method. Many Bluetooth speakers, especially those designed for bathrooms or travel, come with a strong suction cup attached. If yours doesn’t, you can often buy a separate, heavy-duty suction cup hook.
Here’s how to do it:
-
Clean the Surface: Make sure the spot where you want to put the suction cup is clean and dry. Wipe down the tile or glass with a damp cloth, then dry it completely. This helps the suction cup stick really well.
-
Moisten the Cup (Optional but Recommended): Lightly dampen the rim of the suction cup with water. This creates a better seal.
-
Press Firmly: Place the suction cup firmly against the clean, dry surface. Press the center of the cup down and out towards the edges to push out any air. You should feel it create a strong seal.
-
Attach Your Speaker: If your speaker has a loop or a place to hook onto, use that with the suction cup hook. If your speaker is the suction cup (like some models), you’re already done!
-
Test It: Gently tug on the speaker to make sure it’s secure. You don’t want it falling down mid-song!
Pro-Tip: Over time, suction cups can lose their grip, especially in steamy bathrooms. Give it a quick press every week or two to keep it secure. If it starts to peel, just re-clean the surface and re-attach it.
Method 2: The Command Hook Solution
Command Hooks are amazing for renters or anyone who doesn’t want to drill holes. They stick on strong but come off clean. You’ll want to use a Command Hook that’s rated to hold a bit more weight than your speaker.
Here’s the process:
-
Choose the Right Hook: Look for a Command Hook with a weight capacity that’s at least double your speaker’s weight. You can find them at most grocery or hardware stores.
-
Prep Your Surface: This is crucial for Command Hooks! Clean the tile or wall surface with rubbing alcohol. Don’t use regular cleaners, as they can leave residue. Let it dry completely.
-
Apply the Strip: Follow the package instructions carefully. Usually, you peel the backing off the adhesive strip and press it firmly onto the wall for about 30 seconds.
-
Wait! This is the hardest part: you need to let the adhesive set for at least an hour, sometimes longer (check the package). This lets the adhesive bond properly.
-
Hang Your Speaker: Once the hook is set, you can hang your speaker. If your speaker has a loop, you can hang it directly on the hook. If not, you might need to get creative.
Creative Hanging with Command Hooks: If your speaker doesn’t have a loop, you can try attaching a small, sturdy string or a keychain loop to it (if possible) and hang that loop on the Command Hook. Just make sure whatever you attach is secure and won’t slip off.
Method 3: Shelf It! (Small Shelves or Caddies)
If you don’t want to stick anything to your shower walls, a caddy or a small shelf is a great option. These can often hang from the showerhead or shower arm.
How to use a shower caddy:
-
Get a Caddy: Look for a shower caddy that has a flat shelf or tray. Many are made of wire or plastic and simply hook over your shower pipe.
-
Place Your Speaker: Position your speaker on the shelf. Make sure it’s stable and won’t slide off when the caddy is wet or bumped.
-
Positioning is Key: Try to place the caddy so the speaker is not directly under the main water stream. You want it accessible but protected.
Bonus: Some caddies have extra hooks for loofahs or razors, which is always a nice bonus!
Method 4: The “On the Ledge” Approach
Does your shower have a built-in ledge or a wide windowsill? This is the simplest solution of all!
Just do this:
-
Find a Spot: Locate a ledge that’s out of the direct water spray. A good spot is usually a few feet away from the showerhead.
-
Place Your Speaker: Set your speaker down on the ledge. Make sure it’s stable and won’t easily get knocked over.
-
Angle It: You might need to angle the speaker slightly so the sound projects towards you better. Sometimes a slight tilt makes a big difference.
This method is fantastic because it requires absolutely no mounting hardware. Just make sure the ledge is clean and dry before you place your speaker. If the ledge is too close to the shower stream, this might not be the best option for your speaker’s safety.
Important Safety Tips for Your Shower Speaker Setup
We’ve covered the fun stuff, but safety is super important. Here are a few key things to remember:
- Keep it Away from Direct Water: Even water-resistant speakers can be damaged by a direct, strong spray. Aim for a spot where it might get a little mist, but not a drenching.
- Check the IP Rating: Seriously, this is your speaker’s lifeline in the shower. Don’t skip this step when buying!
- Secure Mounting is Non-Negotiable: A falling speaker can damage itself, your shower, or even hurt someone. Always test your mount!
- Ventilation Matters: Don’t completely box in your speaker. It needs a little air circulation, especially when it’s on and getting warm.
- Avoid Electrical Outlets: Keep your speaker and charging cables far away from any electrical outlets or fixtures. Water and electricity are a dangerous mix.
- Listen at a Reasonable Volume: While it’s fun to blast tunes, be mindful of noise levels, especially if you have close neighbors.
Think of these as simple guidelines to ensure your shower concert is always a hit, and never a hazard. A little common sense goes a long way!
Making the Most of Your Shower Sound Experience
Once your speaker is mounted, it’s time to enjoy! But there are a few tricks to make the experience even better.
Placement for Optimal Sound
Where you put the speaker matters for how you hear it. Try to place it at ear level or slightly above. This helps the sound travel directly to you. If it’s too low, the sound might get muffled by steam or water.
Experiment with angles. Sometimes turning the speaker slightly towards you can make a huge difference in clarity. You want to hear your music, not just the echo in the bathroom.
Connectivity Tips
Bluetooth range can be tricky, especially with walls and water. Most showers are small enough that your phone, which might be outside the shower, should have no problem connecting. However, if you experience dropouts:
- Move Your Phone Closer: If possible, keep your phone or device in the bathroom, but still safely away from water.
- Minimize Obstacles: Ensure there aren’t too many thick walls or metal objects between your device and the speaker.
- Re-Pair if Needed: Sometimes, simply turning Bluetooth off and on again on your device, or restarting the speaker, can fix connection issues.
Many modern Bluetooth speakers use newer versions of Bluetooth (like 5.0 or higher), which offer better range and stability. This is something to consider if you often have connectivity problems.
Speaker Features to Look For
Beyond water resistance, what else makes a shower speaker great? Here are a few features that are really handy:
- Built-in Microphone: This lets you take calls without leaving the shower. Just make sure you’re comfortable with that!
- Play/Pause/Skip Buttons: Having controls on the speaker means you don’t have to touch your phone with wet hands.
- Stereo Pairing: If you have two of the same speaker, you can often pair them together for a true stereo sound experience. This is amazing for a more immersive listen.
- Long Battery Life: As mentioned before, you don’t want your music cutting out. Look for speakers that can last for 8-10 hours or more on a single charge.
A quick fact: The first Bluetooth technology was developed in 1994 by Ericsson. It’s come a long way since then, offering better quality and range for all our wireless gadgets!
Comparing Popular Shower Speaker Mounting Options
To help you decide, let’s compare the mounting methods we discussed. Each has its own pros and cons.
| Mounting Method | Pros | Cons | Best For |
|---|---|---|---|
| Suction Cup | Easy to install/remove, no tools needed, widely available. | Can lose suction over time, may not stick to all surfaces, needs regular checking. | Temporary setups, smooth tile or glass surfaces. |
| Command Hook | Strong hold, damage-free removal, works on various surfaces. | Requires careful surface prep and waiting time, hook might be visible. | Renters, those wanting a more permanent but removable solution. |
| Shower Caddy | No sticking to walls, multi-functional, easy to reposition. | Adds clutter to shower space, might not fit all shower designs, speaker can be exposed. | Those who don’t want to alter shower walls, need extra storage. |
| Existing Ledge | Zero effort, no extra cost, completely simple. | Limited placement options, might be too close to water, not always stable. | Showers with built-in ledges or wide sills. |
Choosing the right method really depends on your shower setup and how permanent you want the solution to be. For most people, the suction cup or a good Command Hook offers the best balance of ease and security.
Frequently Asked Questions (FAQ)
Q1: Can I just put any Bluetooth speaker in the shower?
No, it’s not recommended. Most standard Bluetooth speakers aren’t designed to handle moisture. You need a speaker with a good water resistance rating (like IPX5 or higher) to keep it safe from steam and splashes.
Q2: How do I know if my speaker is waterproof enough?
Look for the IP rating on the speaker’s packaging or in its manual. An IPX5 rating means it can handle low-pressure water jets, and an IPX7 rating means it can be submerged in water. For shower use, IPX5 is usually the minimum, but IPX7 is ideal!
Q3: Will steam damage my speaker even if it’s water-resistant?
While water-resistant speakers can handle steam, prolonged exposure to very high humidity isn’t ideal for any electronic device. Placing the speaker where it gets some air circulation and isn’t directly in the thickest steam cloud will help. Always check the manufacturer’s specific guidelines for your speaker.
Q4: How far away should my speaker be from the showerhead?
It’s best to keep it at least a few feet away from the direct spray of the showerhead. You want to hear it clearly without it being constantly hit by water. A good rule of thumb is to place it where it might get a light mist, but not a direct blast.
Q5: My suction cup keeps falling off. What can I do?
Make sure the tile or glass surface is perfectly clean and dry before attaching. You can also try slightly moistening the rim of the suction cup with water to create a better seal. If it’s an old suction cup, it might be time to replace it with a new, heavy-duty one.
Q6: Can I hang my speaker using a string around the shower arm?
You could, but it’s generally not the most secure or aesthetically pleasing method. Ensure the string is strong, waterproof, and tied very securely so the speaker can’t slip. It’s usually better to use a dedicated mounting solution like a suction cup or hook for safety.
Q7: How do I clean my Bluetooth speaker after shower use?
If your speaker is water-resistant, you can usually wipe it down with a damp cloth. For more stubborn grime, use a mild soap and water solution, then wipe with a clean damp cloth and dry thoroughly with a soft, lint-free cloth. Never use harsh chemicals or abrasive cleaners, and ensure the speaker is completely dry before charging.
Ready for Your Shower Concert!
So there you have it! Mounting a Bluetooth speaker in your shower is totally doable and can seriously upgrade your daily routine. We’ve gone over picking the right speaker, several easy mounting methods like suction cups and Command Hooks, and all the safety tips to keep your tech and yourself out of harm’s way.
Remember, it’s all about finding a secure spot that’s out of the direct water stream. Whether you use a trusty suction cup, a clever Command Hook, or just a convenient ledge, you’re well on your way to enjoying your favorite tunes or podcasts while you wash up.
Don’t be afraid to experiment a little to find what works best for your specific shower. The goal is to make your shower time more enjoyable and relaxing. Now go forth and make your bathroom the ultimate personal concert venue!
Now go enjoy amazing sound and make every moment louder and better!