Mount your Bluetooth speaker in the shower easily and securely! This guide shows you simple, DIY methods to enjoy your music or podcasts without worry. No tools required for most fixes!
Hey there, tech adventurer! It’s Max from AffTechy.com, your go-to buddy for making gadgets simple and fun. Ever imagined belting out your favorite tunes or catching up on a podcast while you’re in the shower? It’s a fantastic way to start your day or unwind, right? But then comes the big question: how do you get your speaker in there safely?
We all love our music, but the bathroom can be a tricky spot for electronics. Water and electricity are not exactly best friends. Plus, finding a stable place for your speaker can feel like a puzzle. Don’t worry, though! I’ve been there, and I’m here to help you figure out the easiest ways to get your shower sound system set up.
I know looking at tech specs and complicated instructions can sometimes feel overwhelming. That’s why I’m all about breaking things down into bite-sized, easy-to-understand pieces. We’ll cover everything from choosing the right speaker to actually getting it mounted without any fuss.
So, grab your towel, and let’s dive in! We’ll make sure your shower concerts are safe, sound, and super enjoyable. Let’s get started on this fun project!
Why You Want Tunes in the Tub (or Shower!)
Let’s be honest, a shower is often where we get our best ideas or have our most epic singalongs. It’s a private space, perfect for letting loose. Adding music or a podcast just takes that experience to a whole new level. It can make a mundane morning routine feel like a spa day or a concert hall.

Think about it: no more muffled sounds from another room or worrying about dropping your phone in the sink. With a speaker right there, your audio becomes crystal clear. It’s like having your own personal soundtrack for getting ready. It really makes a difference in your day!
The challenge, of course, is keeping your speaker safe and sound. We don’t want any water damage, and we definitely don’t want our favorite gadget taking a tumble. But with a few smart tricks, this is totally doable.
What Kind of Speaker Works Best in the Shower?
Before we even think about mounting, let’s talk about the speaker itself. Not all speakers are created equal, especially when it comes to moisture. Some are built tough for the outdoors, and those are usually the best bet for a steamy bathroom.
The key thing to look for is water resistance. You’ll see ratings like IPX4, IPX7, or even higher. These numbers tell you how well the speaker can handle water splashes or even submersion. A speaker with a good IP rating means you can relax and enjoy your music without constant worry.
Here’s a quick rundown of what those ratings mean in simple terms:
- IPX4: This means the speaker is protected against water splashes from any direction. It’s like a light rain – okay for a steamy shower.
- IPX5: This is even better. It can handle water jets. So, if you accidentally spray it, it should be fine.
- IPX7: This is the gold standard for shower speakers. It means the speaker can be submerged in up to 1 meter (about 3 feet) of water for 30 minutes. Perfect for any bathroom situation!
So, when you’re shopping, keep an eye out for those IP ratings. They are your best friend for shower-safe audio!
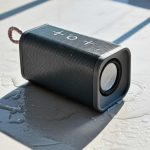
Choosing Your Shower Speaker: Top Features
When you’re picking out a speaker for your shower adventures, there are a few features that really make a difference. It’s not just about the sound quality; it’s also about how it fits into your bathroom life.
Here are some things I always look for:
- Waterproof Rating (IPX): We just talked about this! Aim for at least IPX4, but IPX7 is ideal.
- Suction Cup Mount: Some speakers come with a strong suction cup built-in. This is a game-changer for easy mounting on smooth surfaces like shower tiles.
- Loop or Carabiner: A small loop or an included carabiner clip lets you hang the speaker from a showerhead, hook, or towel bar.
- Battery Life: You don’t want your music cutting out mid-song! Look for speakers that can last for several hours on a single charge.
- Sound Quality: Even in the shower, good sound matters. Look for speakers that offer clear audio and decent bass.
- Bluetooth Connectivity: Make sure it connects easily and reliably to your phone or tablet.
Think about where you want to place it. Do you have smooth tiles? A shower rod? This will help you decide which mounting feature is most important.
How to Mount Your Bluetooth Speaker in the Shower: Easy Fixes
Okay, the moment you’ve been waiting for! Let’s talk about how to get that speaker mounted. You don’t need to be a DIY expert for these methods. In fact, some of them require zero tools!
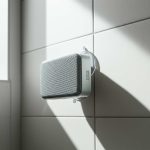
Method 1: The Built-in Suction Cup Superpower
Many portable Bluetooth speakers are designed with showering in mind. They often come with a strong suction cup attached. This is the easiest and most popular method.
Here’s how to use it:
- Clean the Surface: First, make sure the spot where you want to stick the speaker is clean and dry. Wipe down your shower tile or glass with a cloth. Any soap scum or moisture can weaken the grip.
- Moisten the Suction Cup (Optional): Some people find that lightly moistening the edge of the suction cup with water helps it stick better. Just a tiny bit!
- Press Firmly: Press the suction cup firmly onto the clean, dry surface. You want to push out any air trapped underneath.
- Test the Grip: Give the speaker a gentle tug to make sure it’s secure. If it feels loose, try repositioning it or cleaning the surface again.
This is super simple and works great on any smooth, non-porous surface like glass, mirrors, or glossy tiles. It keeps your speaker off the shower floor and within easy earshot!
Method 2: The Handy Hook & Loop (Velcro) Trick
If your speaker doesn’t have a suction cup, or if you want to mount it somewhere without a smooth surface, heavy-duty Velcro is your friend.
You’ll need:
- Heavy-duty, waterproof Velcro strips (the kind used for outdoor or automotive purposes).
- Your Bluetooth speaker.
Here’s the plan:
- Prepare the Speaker: Clean the back or side of your speaker where you’ll attach the Velcro. Make sure it’s dry and free of dust.
- Attach Velcro to Speaker: Peel the backing off one side of the Velcro strip and stick it firmly onto your speaker. Press down for about 30 seconds to ensure a strong bond.
- Prepare the Mounting Surface: Decide where you want to hang your speaker. This could be a smooth tile, a painted wall (if waterproofed), or even the side of a cabinet near the shower. Clean this surface thoroughly.
- Attach Velcro to Surface: Peel the backing off the other side of the Velcro strip and press it firmly onto your chosen mounting spot. Again, hold it for about 30 seconds.
- Let It Cure: For the strongest bond, it’s best to let the Velcro cure for at least 24 hours before attaching the speaker. This allows the adhesive to fully set.
- Mount Your Speaker: Once cured, simply press the speaker onto the mounted Velcro. It should hold securely.
This method is great because it’s versatile. You can mount your speaker almost anywhere! Just make sure you use waterproof Velcro for this.
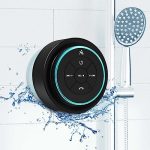
Method 3: The Showerhead Hanger Hack
This is one of the most common and easiest ways, especially if your speaker has a small loop or comes with a carabiner clip.
Here’s what to do:
- Check Your Speaker: See if your speaker has a built-in loop, a small hole for a lanyard, or if it came with a carabiner clip.
- Find a Suitable Spot: The showerhead arm is usually the perfect place. You can also use a towel hook or a dedicated shower caddy hook.
- Hang It Up: Simply loop the lanyard, clip the carabiner, or use the built-in handle to hang your speaker from the showerhead arm or hook.
This method is fantastic because it requires no adhesive and is super easy to move around. Just make sure it’s not directly under the main stream of water. A little bit of steam is fine, but a direct blast isn’t ideal for most speakers.
Method 4: The DIY Command Strip Solution
Command Strips are amazing for damage-free mounting. They come in various sizes and weight capacities.
What you’ll need:
- Water-resistant Command Strips (check the packaging for suitability in damp environments).
- Your Bluetooth speaker.
Here’s the process:
- Clean the Area: Wipe down both the speaker and the mounting surface with rubbing alcohol to remove any oils or residue. Let it dry completely.
- Apply Command Strips to Speaker: Follow the instructions on the Command Strip packaging carefully. Usually, you’ll apply the strips to the back of your speaker.
- Press Firmly: Press the speaker with the attached strips firmly against the wall for about 30 seconds.
- Wait! (Crucial Step): This is super important for Command Strips. You need to wait at least an hour (or as directed on the package) before hanging the speaker. This allows the adhesive to bond properly.
- Mount the Speaker: Gently hang your speaker on the wall where you applied the strips.
Command Strips are brilliant because they hold strong but can be removed without damaging your walls or tiles. Just be sure to use the right weight rating for your speaker!
Method 5: The Freestanding Approach (If All Else Fails)
Sometimes, you just don’t want to mount anything. If you have a shelf, a windowsill, or even a sturdy ledge inside your shower, you can simply place your speaker there.
Things to consider:
- Water Protection: Make sure the spot is not directly in the water’s path. A small ledge or shelf that’s above the main shower spray is perfect.
- Stability: Ensure the surface is flat and stable so the speaker won’t tip over.
- Speaker Type: This works best with speakers that have a flat bottom and don’t vibrate too much.
This is the simplest method if you’re lucky enough to have a suitable spot. No fuss, no installation!
Quick Comparison: Mounting Methods at a Glance
To help you decide which method is best for you, here’s a little table. It breaks down the pros and cons of each approach.
| Mounting Method | Ease of Installation | Surface Requirement | Damage-Free Removal | Durability |
|---|---|---|---|---|
| Suction Cup | Very Easy | Smooth, non-porous (tile, glass) | Yes | Good (can lose grip over time) |
| Velcro | Easy | Most surfaces (clean & dry) | Yes (if applied correctly) | Very Good (with waterproof Velcro) |
| Showerhead Hanger | Easiest | Showerhead arm, hooks | Yes | Excellent (if speaker loop is strong) |
| Command Strips | Easy | Painted walls, tile, laminate | Yes (if followed instructions) | Very Good |
| Freestanding | Easiest | Shelf, ledge, windowsill | N/A | Depends on surface stability |
See? Each method has its own strengths! The best one for you really depends on your shower setup and the type of speaker you have.
Tips for a Great Shower Audio Experience
Once your speaker is mounted, there are a few extra things you can do to make sure your shower listening is top-notch.
Here are some bonus tips:
- Placement is Key: Try to position the speaker so the sound is directed towards you, but not directly in the water spray.
- Connectivity Check: Before you get in, pair your speaker with your device. Make sure you have a good signal. Sometimes, the steam can interfere slightly with Bluetooth, though good speakers handle this well.
- Volume Control: Be mindful of your volume. Shower acoustics can sometimes make things sound louder than they are.
- Keep it Charged: Always charge your speaker after use so it’s ready for your next shower concert.
- Regular Cleaning: Wipe down your speaker occasionally to keep it looking and sounding its best.
A little bit of care goes a long way in making your shower speaker last and perform beautifully.
Understanding Speaker Specs: What’s IPX Really About?
We’ve mentioned IP ratings a few times, and it’s super important for shower speakers. Let’s break it down a bit more. IP stands for “Ingress Protection,” and it’s an international standard for how well a device is protected against solids (like dust) and liquids.
The first digit after “IP” is for solids, and the second is for liquids. For shower speakers, the second digit (the one with the ‘X’ or a number) is what matters most.
IPX4: Protection against splashing water. Think of a light rain. It’s okay for steamy bathrooms.
IPX5: Protection against water jets. If you accidentally aim a showerhead at it, it should be fine.
IPX6: Protection against strong water jets. Even more robust against water.
IPX7: Protection against temporary immersion. This means you could drop it in water (up to 1 meter for 30 mins) and it would likely survive. This is the most common and recommended rating for shower use.
* IPX8: Protection against continuous immersion. This is for devices that are meant to be underwater for extended periods. You don’t usually need this for a shower speaker.
So, when you see a speaker advertised as “waterproof,” always check for that IPX rating. It tells you the real story! For more in-depth info on IP ratings, you can check out resources like CNET’s explanation of IP ratings.
Popular Shower-Friendly Speaker Features Compared
Many brands offer speakers that are great for the shower. They often pack in features that make them ideal for this environment. Here’s a look at some common features and what they offer.
| Feature | What It Does | Why It’s Good for Showers | Example |
|---|---|---|---|
| Integrated Suction Cup | Attaches directly to smooth surfaces. | Easy, tool-free mounting on tiles or glass. | JBL Clip series often has a carabiner, but some models have suction. |
| Carabiner Clip | A sturdy clip for hanging. | Hang from shower rod, hooks, or towel bars. | JBL Clip 4, Ultimate Ears Wonderboom 3. |
| Floating Capability | Speaker floats in water. | Great for bath time, survives accidental drops in the tub. | Insignia Splashproof Portable Bluetooth Speaker. |
| Long Battery Life (>10 Hours) | Plays for many hours on one charge. | No need to worry about charging it every single day. | Many models from brands like Anker and Sony. |
| Speakerphone Function | Built-in microphone to take calls. | Answer calls without touching your phone (though maybe not ideal in a steamy shower!). | Bose SoundLink Micro. |
As you can see, features like carabiner clips and robust suction cups are designed with situations like showering in mind. They make life so much easier!
Troubleshooting Common Shower Speaker Issues
Even with the best setup, sometimes things don’t go perfectly. Here are a few common issues and how to fix them:
- Speaker Won’t Stick: If your suction cup isn’t holding, the surface might be dirty, oily, or too porous. Clean it again with rubbing alcohol and try again. If it’s an old suction cup, it might be time to replace it or try a different mounting method.
- Bluetooth Connection Issues: Sometimes steam can interfere. Try moving the speaker slightly closer to your phone or device. Ensure your device is also water-resistant or kept in a safe, dry place. Restarting both your speaker and device can often fix connection glitches.
- Sound is Muffled: Check if the speaker’s sound outlets are blocked by steam or water. Gently wipe them clean. Also, ensure it’s not placed in a corner that traps sound.
- Speaker Falls Down: This usually means the mounting method isn’t secure enough for the speaker’s weight or the surface isn’t ideal. Double-check the weight limit for Command Strips or Velcro, and ensure surfaces are perfectly clean and dry before application.
Don’t get discouraged if you have a small hiccup! Most of these are easy to solve with a little patience.
Frequently Asked Questions About Shower Speakers
Let’s tackle some questions you might have.
Q1: Can I really put any Bluetooth speaker in the shower?
No, definitely not! Only use speakers that are specifically designed to be water-resistant or waterproof, with a good IPX rating (like IPX4 or higher). Regular speakers can be damaged by moisture.
Q2: How do I know if my speaker is waterproof enough?
Look for the IPX rating on the product description or the speaker itself. IPX4 is splash-proof, and IPX7 means it can be submerged. For showers, IPX4 is the minimum, but IPX7 is much safer.
Q3: Will steam damage my speaker even if it’s waterproof?
While IPX7 speakers can handle immersion, prolonged exposure to very high humidity and steam might eventually affect components. However, for typical shower use, a properly rated speaker should be perfectly fine. Just avoid directing hot water directly at it.
Q4: How far away can my phone be from the speaker in the shower?
Bluetooth typically works up to about 30 feet (10 meters) in open spaces. However, walls and steam can reduce this range. It’s best to keep your phone or device relatively close, perhaps just outside the shower stall or on a nearby shelf.
Q5: Do I need to buy a special shower speaker?
Not necessarily! Many portable Bluetooth speakers are built with water resistance and mounting options (like loops or suction cups) that make them perfect for shower use. You just need to choose one with the right features.
Q6: How do I clean my shower speaker?
After it’s completely dry, you can wipe it down with a soft, damp cloth. For stubborn grime, use a mild soap solution. Make sure to rinse off any soap residue and let it air dry thoroughly. Never use harsh chemicals or abrasive cleaners.
Q7: Can I use my speakerphone in the shower?
Some speakers have a microphone for speakerphone calls. While technically possible, the steam and noise of the shower might make it hard to hear or be heard clearly. It’s usually better for just listening to music or podcasts.
Time to Rock Your Shower!
So there you have it! Mounting a Bluetooth speaker in your shower is totally achievable and can seriously upgrade your daily routine. Whether you use a built-in suction cup, a trusty Velcro strip, a handy carabiner, or even just a stable shelf, there’s a method for everyone.
Remember to always check that IPX rating to ensure your speaker can handle the steamy environment. With a little bit of care and the right mounting trick, you can enjoy your favorite audio content safely and conveniently.
Now go forth and create your personal shower concert hall! You’ve got the knowledge, and the tunes are waiting. Enjoy every splash, every note, and every moment. Make your shower time the best time!