Never miss a beat on the trail! Learn the super-easy way to attach your Bluetooth speaker to your hiking backpack strap so your favorite tunes can go everywhere with you.
Hey there, outdoor adventurers and music lovers! Max here from AffTechy.com, ready to talk about something awesome: bringing your soundtrack to the trails. Imagine hiking with your favorite playlist or catching up on podcasts as you conquer that next peak. It’s pretty cool, right?
But then comes the tricky part. You’ve got this awesome portable Bluetooth speaker, but how do you keep it handy and secure while you’re climbing rocks or trekking through forests? It can feel like a puzzle, trying to figure out the best way to carry it without it bouncing around or getting in your way.
Don’t you worry, though! I’m here to make it super simple. We’ll dive into the best ways to attach your speaker to your hiking backpack strap, making sure it’s safe, accessible, and ready to blast your tunes. Let’s get this adventure started!
Why You Want Your Speaker On Your Backpack
Carrying a portable speaker on a hike is a game-changer. It means your journey isn’t just about the views; it’s about the vibes too. Think about it: a beautiful sunset is even more magical with your favorite chill-out music. Or maybe you’re doing a long hike and need some upbeat tunes to keep your energy high.
But let’s be honest, trying to stuff a speaker into a side pocket or holding it can be a pain. It might fall out, get damaged, or just feel awkward. Having it securely attached to your backpack strap means your hands are free, your speaker is protected, and your music is always within reach. It’s all about making your outdoor experience smoother and more enjoyable.
Choosing Your Trail-Ready Speaker
Before we talk about attaching, let’s quickly touch on picking the right speaker for your adventures. Not all speakers are made for the wild! You’ll want something that’s a bit tough.
Look for speakers that are:
Water-resistant or waterproof: Trails can be unpredictable. Rain, splashes, or even a quick dip in a stream shouldn’t be a problem.
Durable and rugged: Some speakers are built with reinforced casings to handle bumps and drops.
Lightweight and compact: You don’t want to add too much extra weight to your pack.
Long battery life: Hours of music are a must for longer hikes.
A speaker that fits these needs will be a fantastic companion. Now, let’s get to the fun part: attaching it!
The Easiest Ways to Attach Your Speaker
There are a few super simple methods to get your speaker securely fastened to your backpack strap. We’ll go through them one by one.
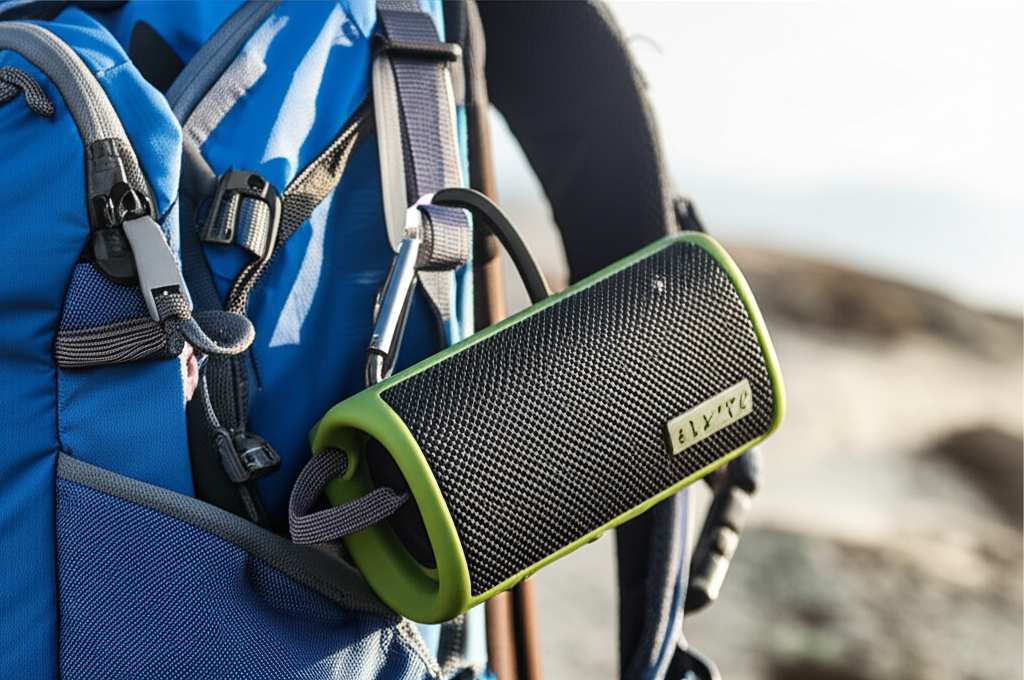
Method 1: The Carabiner Clip Hack
This is probably the most common and easiest fix. Many portable speakers come with a small loop, or you can easily add one.
Here’s what you do:
1. Find the loop on your speaker: Most small Bluetooth speakers have a fabric loop or a sturdy plastic attachment point. If yours doesn’t, don’t worry; we’ll cover alternatives later.
2. Grab a carabiner: A small, sturdy carabiner is perfect for this. You can find them at most outdoor gear stores or even online. Make sure it’s not a load-bearing climbing carabiner, just a simple one for clipping things.
3. Clip it on: Attach the carabiner through the loop on your speaker.
4. Find a strap anchor on your backpack: Look for a daisy chain loop, a sternum strap buckle, or any other strong point on your backpack’s shoulder strap.
5. Secure the carabiner: Clip the carabiner onto your chosen anchor point on the backpack strap.
And voilà! Your speaker is now hanging securely. It’s easy to access and won’t fall off.
Pro Tip: Make sure the carabiner is clipped to something that won’t easily snag on branches. A sternum strap buckle is often a great, safe spot.
Method 2: Using a Dedicated Speaker Strap or Mount
Some brands make special straps or mounts designed specifically for attaching speakers to backpacks or bikes. These often offer a more secure and adjustable fit.
What to look for:
Adjustable Velcro straps: These wrap around the speaker and then around your backpack strap.
Silicone mounts: These grippy holders stretch to fit your speaker and often have integrated loops for carabiners.
Specialized backpack clips: Some are like heavy-duty clips that attach directly to webbing.
How to use them:
1. Attach the mount to your speaker: Follow the instructions for your specific mount. This might involve sliding the speaker into a silicone holder or wrapping straps around it.
2. Position on your backpack strap: Find a good spot on your shoulder strap.
3. Secure the mount: Wrap the Velcro straps tightly or use the integrated clip to fasten it to the backpack webbing.
These mounts often provide a snugger fit, meaning less rattling and bouncing.
Method 3: The Zip Tie and Webbing Trick (For Speakers Without Loops)
What if your speaker doesn’t have a loop? No problem! You can create one using a zip tie.
You’ll need:
A sturdy zip tie (the longer, the better).
Your speaker.
A backpack strap with some webbing.
Here’s the simple process:
1. Find a good spot on your speaker: Look for a place where you can wrap the zip tie around the body of the speaker without blocking any buttons or speakers. Sometimes, you can loop it around the handle if it has one.
2. Loop the zip tie: Thread the zip tie through itself to form a loose loop around the speaker. Don’t tighten it yet.
3. Thread through backpack webbing: Carefully thread one end of the zip tie through a sturdy piece of webbing on your backpack strap. You might need to find a gap in the stitching or weave it through a loop.
4. Tighten and secure: Pull the zip tie snug. You want it tight enough to hold the speaker but not so tight that it damages the speaker or the strap. You can then use a second zip tie to secure the first one, or even attach a carabiner to the zip tie loop.
Friendly Note: This method is best for speakers you don’t plan to remove very often, as zip ties can be a bit of a hassle to undo. Make sure the zip tie isn’t digging into your skin when the strap is on!
Method 4: The Lanyard Attachment
If your speaker has a small hole for a lanyard (like many portable chargers or small electronics), you can use that!
What you need:
A sturdy lanyard.
Your speaker.
A carabiner or a way to attach the lanyard to your backpack.
Here’s how:
1. Attach the lanyard to your speaker: Thread the end of the lanyard through the hole on your speaker and pull it through to create a loop.
2. Connect to your backpack: You can then clip the lanyard loop directly to a strap anchor on your backpack using a carabiner. Alternatively, some lanyards have clips built-in that can attach to webbing.
This is a quick and easy solution if your speaker is designed for it.
Key Features to Look for in Attachment Gear
When you’re choosing how to attach your speaker, think about these handy features:
Durability: You want whatever you use to be tough enough for the outdoors.
Adjustability: Being able to get a snug fit prevents your speaker from bouncing around.
Ease of Use: You should be able to attach and detach your speaker quickly and easily.
Compatibility: Does it work with your specific speaker and backpack?
Weight: Extra weight is always a consideration on a hike.
Making Sure Your Speaker Stays Put: Stability Tips
Even with the best attachment, a speaker can sometimes shift. Here are some tips to keep it stable:
Positioning is key: Try attaching your speaker to different parts of the shoulder strap. The sternum strap area is often a good, stable spot.
Tighten straps: Make sure your backpack’s sternum strap and load lifters are adjusted correctly. This helps keep the whole pack stable.
Balance your load: If your speaker is on one side, make sure your pack is balanced. Heavy items should be close to your back.
Consider a protective case: A soft pouch or a silicone cover can add grip and protect your speaker from bumps, reducing rattling.
Speaker vs. Backpack Strap: A Quick Comparison
Let’s look at how different attachment methods compare for your hiking needs.
| Attachment Method | Ease of Use | Security | Portability | Best For |
|---|---|---|---|---|
| Carabiner Clip | Very Easy | Good | High | Quick setup, frequent removal |
| Dedicated Mount | Easy to Moderate | Excellent | Moderate | Maximum security, minimal bounce |
| Zip Tie | Moderate (for removal) | Good | Low (if zip tie is permanent) | Permanent or semi-permanent attachment |
| Lanyard | Easy | Moderate | High | Speakers with lanyard holes |
As you can see, the carabiner is a fantastic all-rounder for most hikers. If you want something super secure that won’t budge, a dedicated mount is your best bet. Zip ties are great if you don’t plan on taking the speaker off often, and lanyards are a simple option if your speaker supports them.
Fun Facts About Portable Audio
Did you know that the first portable music player, the Sony Walkman, was released way back in 1979? It changed how people listened to music on the go! Fast forward to today, and Bluetooth speakers have taken that freedom to a whole new level, allowing us to share our music anywhere.
And speaking of sharing, a study by Music Ally found that outdoor activities can actually enhance the enjoyment of music, making the whole experience more immersive. So, attaching that speaker is not just convenient; it’s about amplifying your enjoyment of nature!
Choosing the Right Speaker Size for Your Pack
The size and weight of your speaker matter when attaching it. A tiny speaker might get lost on a big pack, while a huge one can feel like a burden.
Here’s a general guide:
Mini Speakers (under 1 lb / 0.45 kg): These are super portable. They attach easily with a carabiner or lanyard and are great for solo hikes or short trips. Think brands like JBL Go or Anker Soundcore Mini.
Medium Speakers (1-3 lbs / 0.45-1.36 kg): These offer better sound and battery life. They work well with dedicated mounts or a sturdy carabiner on a well-fitted backpack. Examples include the JBL Flip or Bose SoundLink Micro.
Larger Speakers (over 3 lbs / 1.36 kg): While some might be rugged, these are generally less ideal for attaching directly to a shoulder strap. They might be better suited for car camping or keeping in your base camp.
Speaker Size vs. Attachment Method Guide
| Speaker Type | Typical Weight | Recommended Attachment | Notes |
| :———– | :————- | :——————— | :——————————————– |
| Mini | 3 lbs | Not Recommended for Strap | Better for base camp, might be too heavy |
It’s always a good idea to check the weight of your speaker. You don’t want it pulling down on your shoulder strap all day! Aim for something that feels balanced and comfortable.
Maintaining Your Speaker and Attachment Gear
To keep your tunes going strong and your gear in good shape:
Clean your speaker regularly: Wipe it down with a damp cloth to remove dust and dirt, especially after dusty trails.
Check for damage: Periodically inspect your speaker, carabiner, straps, or mounts for any signs of wear and tear.
Dry thoroughly: If your speaker gets wet, let it air dry completely before re-attaching it.
Store properly: When not in use, store your speaker and attachment gear in a cool, dry place.
When to Use a Speaker and When to Just Listen
While bringing music is fun, it’s also important to be mindful of your surroundings and fellow hikers.
Consider these points:
Trail etiquette: Keep the volume at a reasonable level. You want to enjoy your music, but not disturb others or wildlife.
Safety first: In areas with wildlife or tricky terrain, it’s often better to have your ears free to listen for warnings or sounds.
Moments of silence: Sometimes, the best soundtrack is the natural sound of the wilderness. Enjoy those quiet moments too!
You can find great tips on outdoor etiquette from organizations like the Leave No Trace Center for Outdoor Ethics.
Frequently Asked Questions (FAQ)
Q1: Can I attach any Bluetooth speaker to my backpack strap?
You can attach most portable Bluetooth speakers! The easiest ones have a loop or handle. If yours doesn’t, you can often use zip ties or a universal speaker mount to create an attachment point.
Q2: Will my speaker fall off if I attach it with a carabiner?
If you use a sturdy carabiner and clip it to a secure point on your backpack strap, it’s unlikely to fall off during normal hiking. Just make sure it’s clipped tightly and that the carabiner’s gate is closed properly.
Q3: Is it safe to have a speaker attached to my shoulder strap?
Yes, as long as it’s securely attached and not too heavy, it’s generally safe. Be mindful of the volume and ensure it doesn’t hinder your movement or balance.
Q4: How do I prevent my speaker from rattling on my backpack?
To reduce rattling, ensure the speaker is attached snugly. Using a soft pouch or a silicone holder can also add cushioning. Experiment with different attachment points on your strap to find the most stable spot.
Q5: What if my speaker doesn’t have a loop for attaching it?
No worries! You can use a strong zip tie to create a loop around the speaker’s body, which you can then attach to your backpack. Alternatively, many universal speaker straps or mounts are designed to fit speakers without built-in attachment points.
Q6: How do I protect my speaker from the elements when it’s attached to my backpack?
Look for speakers that are water-resistant or waterproof. For added protection, consider a small, padded pouch or a silicone cover that can be attached along with the speaker.
Q7: Can I attach a speaker to my hip belt instead of my shoulder strap?
Yes, you absolutely can! Some hikers prefer the hip belt for easier access or if they find shoulder strap attachment uncomfortable. Just make sure it’s secure and doesn’t interfere with your stride.
Your Adventure Soundtrack Awaits!
So there you have it! Attaching your Bluetooth speaker to your hiking backpack strap is a super simple way to bring your favorite sounds along for the ride. Whether you’re using a trusty carabiner, a dedicated mount, or a clever zip tie trick, you’re all set to create an epic soundtrack for your next outdoor adventure.
Remember, the goal is to enhance your experience, not detract from it. Keep the volume respectful, stay aware of your surroundings, and most importantly, have fun! Now go explore, hike, and let the good times (and good tunes) roll. Happy trails!