Unlock amazing audio quality by connecting your sound box to a mixer console! This guide walks you through the essential steps, from understanding your equipment to optimizing your sound. Learn how to use a sound box with a mixer console to gain precise control over your audio and achieve professional-sounding results for any event or recording.
So, you’ve got a sound box and a mixer console, and you’re wondering how to get them to sing in harmony? It might seem a little daunting at first, but trust me, it’s more about understanding a few fundamental concepts than anything overly complicated. Think of it like building with LEGOs – you just need to know which blocks connect to which. Using a sound box with a mixer console is your ticket to unlocking a whole new level of audio control and quality. Whether you’re setting up for a small gig, a presentation, a home recording studio, or even just want to enjoy your music with audiophile-grade sound, this guide is here to help you make sense of it all.
Many people think of “sound box” as a generic term for a speaker, but in the context of a mixer console, it often refers to a powered speaker with built-in amplification, or sometimes even a specific type of audio processing unit. For the purpose of this guide, we’ll primarily focus on connecting powered speakers to a mixer, as this is the most common scenario. However, the principles discussed will largely apply even if your “sound box” is a different type of audio output device. The goal is to get your audio signal from your mixer to your sound box in the cleanest, most effective way possible.
## Understanding Your Equipment: The First Step to Sonic Success
Before you even think about plugging anything in, let’s get to know the stars of our show: your sound box and your mixer console. Each piece of gear has its own language of inputs and outputs, and understanding these is like learning the alphabet for audio.
### Your Mixer Console: The Brains of the Operation
Your mixer console is where all the magic begins. It’s the central hub that takes all your audio sources – microphones, instruments, playback devices – and allows you to control them.
* Inputs: These are where your audio sources plug in. You’ll typically find XLR inputs for microphones and balanced TRS (Tip-Ring-Sleeve) inputs for line-level signals like keyboards or other mixers. Some mixers also have unbalanced ¼-inch TS (Tip-Sleeve) or RCA inputs for less critical sources.
* Outputs: These are where the processed audio signal leaves the mixer. The most important outputs for connecting to a sound box are usually the Main Outs (often XLR or ¼-inch TRS). You might also find Aux Sends (for monitor mixes or effects) and Control Room outputs.
* Controls: This is where the fun happens! You’ll have gain knobs (to set the initial level of your input signal), EQs (for bass, mid, and treble adjustments), faders (to control the volume of individual channels and the overall output), and possibly aux sends and effects controls.
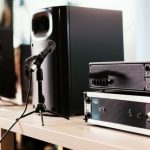
### Your Sound Box (Powered Speaker): The Voice of Your Sound
Your sound box, or powered speaker, is what actually produces the sound you hear.
* Inputs: Most powered speakers will have at least one or two inputs. These can be XLR, ¼-inch TRS, or sometimes RCA. Some might even have Bluetooth connectivity, which is a different connection method but achieves a similar result of getting audio to the speaker.
* Outputs: Some speakers have an output jack that allows you to “daisy-chain” another speaker to it. This is useful if you need more coverage.
* Amplifier: The “powered” in powered speaker means the amplifier is built right in. You won’t need a separate power amplifier for these.
* Controls: Usually, there’s a power switch, a volume knob, and sometimes basic EQ controls on the speaker itself.
## Connecting the Dots: Cables and Signal Flow
Now that you know your equipment, let’s talk about how they connect. The right cable and understanding the signal flow are critical for a clean and powerful sound.
### Choosing the Right Cables
Using the correct cables ensures you get the best possible audio quality and avoid annoying hums or buzzes.
* XLR Cables: These are the go-to for microphone connections and for professional line-level audio. They have three pins and are balanced, meaning they reject noise very effectively. You’ll often use XLR cables to connect the Main Outs of your mixer to the inputs of your powered speakers.
* TRS Cables: These ¼-inch cables have three contact points (Tip, Ring, Sleeve). Like XLR, they are balanced and are excellent for connecting line-level sources and for main outputs.
* TS Cables: These are your standard unbalanced ¼-inch guitar cables. They are fine for some instruments but are more susceptible to noise over longer distances.
* RCA Cables: These are commonly found on consumer audio equipment like CD players or some home stereos. They are unbalanced and generally not recommended for professional audio connections over significant distances due to their susceptibility to noise.
### Understanding Signal Flow
Signal flow is the path your audio takes from its source to the listener’s ears. When using a sound box with a mixer, the typical flow looks like this:
1. Audio Source: Microphone, instrument, music player.
2. Mixer Inputs: The signal enters the mixer.
3. Mixer Processing: You adjust levels, EQ, and apply effects.
4. Mixer Main Outputs: The final, mixed signal leaves the mixer.
5. Cables: The signal travels through your chosen cables.
6. Sound Box Inputs: The signal enters the powered speaker.
7. Sound Box Amplification: The built-in amplifier boosts the signal.
8. Sound Box Speaker Driver: The sound is produced.
**Example:** You’re setting up for a small presentation. Your laptop’s audio output (line-level) will connect via a ¼-inch TRS to dual ¼-inch TS cable to a stereo channel on your mixer. Then, you’ll use two XLR cables to connect the mixer’s Main Left and Main Right outputs to the XLR inputs on your two powered speakers. This ensures you have stereo sound from your laptop.
## Setting Up Your Mixer and Sound Box: The Practical Steps
Let’s get down to the nitty-gritty of connecting everything. This is where the theory meets practice.
### Step-by-Step Connection Guide
1. Power Off All Devices: Always ensure everything is turned off and unplugged before making connections. This prevents accidental pops or damage to your equipment.
2. Connect Audio Sources to Mixer: Plug in your microphones, instruments, or playback devices into the appropriate inputs on your mixer.
3. Connect Mixer Outputs to Sound Box Inputs: This is the crucial link.
* Mono Setup: If you’re using a single powered speaker, connect one of the mixer’s Main Outs (e.g., Main Out Left) to the input of your speaker. You might choose to sum your mix to mono if your mixer has that option, or just send the left or right channel.
* Stereo Setup: For stereo sound, use two powered speakers. Connect the Mixer’s Main Out Left to the input of the left speaker and the Mixer’s Main Out Right to the input of the right speaker. Use appropriate cables (XLR or TRS are best here).
4. Connect Power Cables: Plug in the power cables for your mixer and your powered speakers.
5. Connect Your Sound Box to Mixer via Bluetooth (if applicable): If your sound box has Bluetooth, you’ll usually pair it directly with your audio source (like a phone or laptop) and then send that audio *into* the mixer via a line input. Alternatively, some sound boxes might pair *with* a Bluetooth transmitter connected to the mixer’s output, but this is less common for professional setups. For improving sound quality from devices like an Amazon Echo, you can explore guides on [how to use echo as bluetooth speaker amazing guide 2](https://afftechy.com/how-to-use-echo-as-bluetooth-speaker-amazing-guide-2/).
### Powering Up and Initial Setup
Once everything is connected:
1. Turn On Sound Boxes First: Power up your powered speakers first. This allows them to boot up without receiving any signal “thump.”
2. Turn On Mixer Second: Power on your mixer console.
3. Set All Faders and Volume Knobs to Minimum: Ensure all channel faders and the master fader are all the way down. Turn any output volume knobs on your sound boxes to their lowest setting as well.
## Gain Staging: The Secret to Clean Sound
Gain staging is arguably the most important concept in audio engineering. It’s all about setting the correct signal levels at each stage of your audio chain to get the best signal-to-noise ratio and prevent distortion.
### What is Gain Staging?
Gain staging is the process of setting the appropriate input gain (level) for each device in your audio signal path. It’s not just about making things loud; it’s about ensuring a healthy, clean signal throughout the system.
### How to Set Your Gain
1. Start with the Source: If you’re using a microphone, set the gain knob on the mixer’s channel for that microphone. Speak or sing into the mic at the loudest level you expect during your performance or presentation. Adjust the gain knob until the signal is strong but *never* clipping (indicated by a red “clip” or “peak” light on the mixer). A good starting point is to have the signal hitting around 0dB on the mixer’s meter when it’s at its loudest.
2. Adjust Channel Faders: Once the input gain is set, use the channel fader to control the level of that specific input in your overall mix.
3. Set Master Fader and Speaker Volume: Bring up the master fader on your mixer gradually. Simultaneously, slowly increase the volume knob on your powered speakers. Listen carefully for any distortion. You want to achieve your desired listening volume without pushing any component into clipping.
**Tip:** Always aim to have your mixer’s output signal be strong but not clipping. Then, use the volume controls on your powered speakers to achieve your final listening level. This provides more headroom and better control. If you’re using multiple speakers, you can also explore [how to connect multiple bluetooth speakers amazing party sound](https://afftechy.com/how-to-connect-multiple-bluetooth-speakers-amazing-party-sound/) for wider sound coverage, but remember the mixer is your primary control.
## Shaping Your Sound: EQ and Effects
Once you have a clean signal and healthy levels, you can start shaping your audio to sound its best. Your mixer console is equipped with tools to do just that.
### Equalization (EQ)
EQ allows you to boost or cut specific frequencies in your audio.
* Bass (Low Frequencies): Controls the warmth and fullness of the sound. Too much can make it muddy; too little can make it thin.
* Mids (Mid Frequencies): Crucial for clarity and presence. This is where vocals and most instruments sit. Cutting excessive mids can help reduce feedback.
* Treble (High Frequencies): Adds sparkle, air, and definition. Too much can sound harsh or sibilant; too little can sound dull.
Practical Example: If your vocals sound muddy, try gently cutting some low-mid frequencies (around 200-400Hz) on that channel. If your sound box speakers sound a bit harsh, you might try a slight cut in the high frequencies. This is also where understanding [how to position speakers for best sound at office party amazing tips](https://afftechy.com/how-to-position-speakers-for-best-sound-at-office-party-amazing-tips/) can come into play, as room acoustics affect how EQ choices are perceived.
### Effects
Many mixers have built-in effects like reverb and delay.
* Reverb: Adds a sense of space and depth, making sound more natural or creating a desired atmosphere.
* Delay: Creates echoes, which can be used creatively or to thicken a sound.
Use effects sparingly. Too much can make your audio sound messy and unprofessional.
## Monitoring and Troubleshooting
Listening to your audio is critical, and so is knowing what to do when things don’t sound right.
### The Importance of Monitoring
Always use your sound box as your primary monitor, but if possible, also use headphones connected to your mixer’s headphone output. This allows you to hear details you might miss through the speakers, especially when dealing with potential issues like feedback. If you’re experiencing unwanted echo, it might be related to the acoustics of the space, and resources on [how to prevent echo or feedback during office events with speakers banish bad sound](https://afftechy.com/how-to-prevent-echo-or-feedback-during-office-events-with-speakers-banish-bad-sound/) can be very helpful.
### Common Problems and Solutions
* No Sound:
* Check all connections.
* Ensure all devices are powered on.
* Verify that faders and volume knobs are up.
* Check that the correct inputs are selected on your sound box.
* Hum or Buzz:
* This is often due to grounding issues or electrical interference. Try plugging your mixer and speakers into the same power strip or outlet. Use balanced cables (XLR or TRS) whenever possible.
* Ensure cables are not running near power cables or fluorescent lights.
* Distortion (Clipping):
* Lower the gain on the input channel or the master fader.
* Lower the volume on your powered speakers.
* Ensure your sound box is not undersized for the power you’re sending it.
* Feedback (Howling/Screeching):
* This happens when sound from your speakers is picked up by your microphones and re-amplified.
* Turn down the volume of the affected channel or the master volume.
* Move microphones away from speakers.
* Use EQ to cut the specific frequency that is feeding back (often in the mid-range).
Using a sound box with a mixer console empowers you to take control of your audio like never before. By understanding your equipment, using the right connections, employing proper gain staging, and knowing how to shape and troubleshoot your sound, you can achieve professional-grade results. So, go forth, connect your gear, and let your sound shine!
Key Takeaways
- Understanding Your Gear is Crucial: Familiarize yourself with the inputs and outputs of both your sound box and mixer console before making any connections.
- Cable Selection Matters: Use the correct types of cables (XLR, TRS, RCA) to ensure a clean and reliable audio signal between your devices.
- Signal Flow is Key: Understanding how audio travels from your sound source, through the mixer, and to your sound box is fundamental for proper setup.
- Gain Staging is Essential: Proper gain staging prevents distortion and ensures a healthy signal level throughout your audio chain.
- EQ and Effects for Polish: Utilize the mixer’s EQ and effects to shape your sound and correct any sonic imperfections.
- Monitoring is Your Best Friend: Listen carefully to your audio through your sound box and headphones to make informed adjustments.
- Troubleshooting Common Issues: Be prepared to identify and resolve common problems like hum, buzz, or no sound.
Frequently Asked Questions
What is the main advantage of using a mixer console with a sound box?
The main advantage is gaining comprehensive control over your audio. A mixer allows you to adjust individual sources, apply equalization, add effects, and blend everything together before sending the final signal to your sound box for amplification.
Can I use any cable to connect my mixer to my sound box?
While you can technically connect them with various cables, it’s highly recommended to use balanced cables like XLR or TRS for the best audio quality. These cables help minimize noise and interference, especially over longer distances.
What does “gain staging” mean in this context?
Gain staging refers to setting the appropriate signal level at each stage of your audio chain, from the input source to the output speaker. Proper gain staging prevents distortion and ensures a clean, healthy signal, optimizing your sound quality.
How do I prevent feedback when using my mixer and sound box?
Feedback occurs when the sound from your speakers is re-captured by your microphones. To prevent it, lower your overall volume, reposition microphones away from speakers, and use your mixer’s EQ to cut specific problematic frequencies.
My sound box is powered, do I still need an external amplifier?
No, if your sound box is a powered speaker, it already has a built-in amplifier. You do not need an external power amplifier. You connect your mixer’s output directly to the input of the powered sound box.
What if my sound box only has an auxiliary (AUX) input?
If your sound box has an AUX input (typically a 3.5mm jack), you’ll need a cable that converts your mixer’s output (usually ¼-inch or XLR) to a 3.5mm stereo plug. Be aware that AUX inputs are generally unbalanced and can be more susceptible to noise than professional inputs.