To replace a laptop hard drive quickly and effectively, start by backing up your data, then power down the laptop and disconnect it from any power source. Remove the back cover, locate the hard drive, disconnect it, and carefully swap it out with a new one before reassembling everything. It’s a straightforward process that can breathe new life into your device without needing expert help.
If you want to replace your laptop hard drive, the first step is to backup your data and ensure you have the right tools, such as a screwdriver and the correct replacement drive. Next, turn off your laptop, disconnect all power sources, and open the back panel. Carefully disconnect the existing drive, remove it, and install the new one in its place. Finally, reassemble your laptop, boot it up with a proper OS installation, and restore your data.
Replacing a laptop hard drive may sound intimidating, but it’s actually a manageable project even for beginners. Whether you’re upgrading for more storage or replacing a faulty drive, knowing how to do it yourself can save time and money. The process involves a few simple steps: turning off your laptop, opening the case, removing the old drive, installing the new one, and then setting up your operating system again. With patience and the right tools, you’ll have your laptop running smoothly on a fresh hard drive in no time.

How to Replace a Laptop Hard Drive: Step-by-Step Guide
Replacing a laptop hard drive might seem intimidating at first, but with the right tools and instructions, it’s a manageable task. This process allows you to upgrade your laptop’s storage capacity or swap out a failing drive. Here, we’ll walk you through each step to help you successfully replace your hard drive.
Preparing for the Hard Drive Replacement
Before starting, gather all necessary tools and backup your data. It’s better to be prepared to avoid complications during the process.
Gather the Required Tools and Supplies
- Screwdriver set (usually Phillips-head)
- Antistatic wrist strap (optional but recommended)
- Replacement hard drive (HDD or SSD)
- USB drive or external enclosure (for data transfer or cloning)
- Data backup solution (cloud storage, external drive, etc.)
Backup Your Data
Always back up important files before removing your existing hard drive. Use cloud services or an external drive for a quick copy of your critical data.
Check Your Laptop Model and Compatibility
Different laptops have different hard drive types and sizes. Verify your laptop’s model number to find compatible drives and detailed instructions.
Understanding Laptop Hard Drives and Storage Options
Knowing the types of hard drives helps you choose the right replacement.
Types of Hard Drives
- Traditional HDD (Hard Disk Drive): Cost-effective with larger storage capacity.
- SSD (Solid-State Drive): Faster, more durable, and energy-efficient, but usually more expensive.
Common Hard Drive Form Factors
| Form Factor | Dimensions | Use Cases |
|---|---|---|
| 2.5-inch | Width: 69.85 mm (2.75 inches) | Most laptops use this size for HDDs or SSDs |
| M.2 | Varies (22 mm wide typical) | Some ultrabooks and modern laptops |
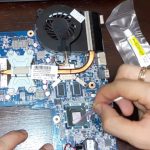
Step-by-Step Removal of the Old Hard Drive
Careful handling during removal is crucial to avoid damage.
Power Down and Unplug the Laptop
Ensure your laptop is completely turned off and disconnect all cables and accessories. Remove the battery if it’s removable.
Open the Laptop Case
Locate the screws securing the back cover. Use your screwdriver to remove these screws carefully. Keep track of each screw for reassembly.
Locate the Hard Drive
Most laptops have the hard drive in a dedicated bay. It is usually held in place with brackets or screws.
Disconnect the Hard Drive
Gently unplug the hard drive connector or slide out the drive if it’s in a caddy. Avoid forcing the connector to prevent damage.
Remove the Hard Drive from Mounting
Unscrew or unclip the drive from its mounting bracket. Keep these screws safe for later reinstallation.
Installing the New Hard Drive
With the old drive removed, it’s time to put the new one in.
Prepare the Replacement Drive
If needed, clone your old drive onto the new drive using an external enclosure or cloning software. This ensures data and OS transfer.
Mount the New Hard Drive
Secure the new drive into the mounting bracket using the screws you previously removed. Make sure it’s firmly in place.
Reconnect the Hard Drive
Plug in the SATA or NVMe connector securely. Ensure everything clicks into place properly.
Close the Laptop Case
Replace the back cover and tighten all screws evenly. Reinsert the battery if you removed it earlier.
Post-Installation Setup
Getting your new hard drive ready involves installing an operating system or restoring data.
Boot from Installation Media
Create a bootable USB drive with your OS installation files. Insert it into the laptop and power it on to start the installation process.
Install or Clone Your Operating System
Follow the on-screen instructions to install Windows, macOS, or Linux. If you cloned your drive, the system should recognize the data automatically.
Update Drivers and Software
After installation, check for driver updates and ensure your system is running smoothly.
Additional Tips for a Smooth Hard Drive Replacement
- Work in a static-free environment to prevent component damage.
- Take your time during disassembly and reassembly.
- Use proper tools to avoid stripping screws or damaging components.
Troubleshooting Common Issues
If your laptop doesn’t recognize the new drive, double-check the connections. For boot problems, verify your BIOS or UEFI settings to ensure the drive is detected.
Benefits of Replacing Your Laptop Hard Drive
Replacing your hard drive can improve your laptop’s speed, increase storage capacity, and extend its lifespan. Upgrading to an SSD especially enhances overall system responsiveness and reduces load times.
Related Topics
Upgrading from HDD to SSD
Switching an HDD for an SSD can dramatically boost your system’s performance. It involves similar steps but offers a significant speed increase.
Cloning a Hard Drive
Cloning helps transfer your operating system, files, and settings to the new drive without reinstalling everything. Use specific cloning software or external enclosures.
Data Recovery from a Failed Hard Drive
If your old drive is damaged, professional data recovery services or specialized software might help retrieve important files before replacing the drive.
Replacing RAM or Battery
While replacing the hard drive, consider upgrading other components like RAM or replacing the battery for optimal performance.
Replacing a laptop hard drive doesn’t have to be daunting. With patience and proper tools, you can do it yourself and enjoy faster speeds and more storage space. Just follow each step carefully, and you’ll have your laptop running smoothly with a new hard drive in no time.
How to Replace Hard Drive Laptop – How to Remove Laptop Hard Drive – Fun & Easy
Frequently Asked Questions
What tools are necessary to replace a laptop hard drive?
To replace a laptop hard drive, you typically need a small Phillips-head screwdriver to remove screws. An anti-static wrist strap helps prevent static damage to internal components. You may also require plastic pry tools or a spudger to carefully open the laptop casing without damaging it. If you’re installing an SSD or a different drive, ensure you have the appropriate mounting brackets or adapters if needed.
How can I safely open my laptop to access the hard drive?
First, turn off your laptop and disconnect all cables and the power adapter. Remove the battery if possible. Use the screwdriver to remove the screws securing the back panel, and keep them in a safe place. Gently pry open the casing using plastic tools to avoid scratching or breaking the plastic. Locate the hard drive, which is usually secured with screws or a mounting bracket. Carefully disconnect any cables attached to the drive before removing it.
How do I clone my existing data to the new hard drive?
Connect your new drive to your laptop using an external enclosure or a USB-to-SATA adapter. Use disk cloning software to copy your current drive’s contents, operating system, and partitions onto the new drive. Follow the software instructions carefully to ensure a complete clone. Once cloned, shut down your laptop, replace the old drive with the new one, and boot up to verify that everything transferred correctly.
What should I do after installing the new hard drive to get my laptop running again?
After installing the new drive, reassemble the laptop by securing all screws and reattaching the back panel. Connect the power supply and turn on the laptop. Enter the BIOS or UEFI settings to ensure the drive is recognized. If necessary, install or reinstall your operating system using a recovery drive or installation media. Format the new drive if it’s not already prepared during the OS installation process. Once set up, restore any files from backups.
Final Thoughts
To replace a laptop hard drive, start by backing up your important data. Power off the laptop, remove the battery if possible, and locate the hard drive compartment. Unscrew and carefully disconnect the old drive. Insert the new hard drive, reconnect, and secure it with screws. Finally, restore your data and boot up to ensure everything functions correctly. Knowing how to replace a laptop hard drive simplifies upgrades and repairs, saving you time and money.