Attach your Bluetooth speaker to your hiking gear easily! This guide shows you quick, secure ways to bring your tunes on any adventure. No more fumbling, just pure sound on the trail.
Hey there, tech adventurers! Max here from AffTechy.com, your go-to spot for making gadgets simple and fun. You know those moments when you’re out on a hike, surrounded by nature’s amazing sounds, and you just wish you had your favorite playlist to go with it? I totally get it. Music can make any experience better, even a tough climb.
But then comes the question: how do you actually bring that speaker with you without it being a total pain? We’ve all seen people struggling with gear. Maybe you’ve tried stuffing a speaker in a backpack pocket that’s too small, or it keeps bouncing around. It can get pretty frustrating when you just want to enjoy the view and some good tunes.
Well, I’m here to tell you that it doesn’t have to be complicated. We’re going to dive into some super simple, super effective ways to attach your Bluetooth speaker to your hiking belt or harness. Think of it as upgrading your hiking experience with your personal soundtrack, securely and effortlessly.
Ready to get your music game on point for your next trek? Let’s break it down step by step!
Why Bring a Bluetooth Speaker on a Hike?
Okay, first things first. Why would you even want a speaker on a hike? Some people love the quiet of nature. That’s cool too! But for others, music adds a whole new layer to the adventure. It can boost your energy on a long trail, create a fun atmosphere for a group, or simply make a solo hike feel more engaging.
Imagine reaching a beautiful viewpoint, and as you pull out your snacks, your favorite upbeat song starts playing. Or maybe you’re hiking with friends, and you can share some background music that everyone enjoys. It’s like having your own personal DJ, but way more portable! Plus, some speakers are pretty rugged these days, designed to handle a little bit of the outdoors.
Choosing the Right Speaker for Your Hike
Before we talk about attaching, let’s touch on picking the right speaker. Not all Bluetooth speakers are created equal, especially when you’re heading outdoors. You want something that’s not too big or heavy, but still sounds good. Durability is also a big plus!
Here are some things to look for:
Size and Weight: A giant speaker will just weigh you down. Look for something compact, maybe the size of your hand or a bit larger.
Durability: Does it feel solid? Is it made of tough stuff? Many outdoor speakers are built to be tough.
Water and Dust Resistance: Hiking can mean unexpected rain or dusty trails. Look for an IP rating (like IPX5 or IPX7). This tells you how well it can handle water and dust.
Battery Life: You don’t want your music to die halfway through your hike! Check how long the battery lasts on a single charge.
Sound Quality: Even small speakers can sound great these days. Read reviews to see what people say about the sound.
Here’s a quick peek at some popular types and what they’re good for:
| Speaker Type | Best For | Pros | Cons |
|---|---|---|---|
| Mini Portable Bluetooth Speaker | Lightweight hikers, short trips | Very small, light, easy to carry | Lower battery life, less powerful sound |
| Rugged Outdoor Speaker | Adventurous hikers, all conditions | Durable, water/dust resistant, good battery | Slightly heavier, can be pricier |
| Clip-On Speaker | Convenience, quick attachment | Built-in clip, very portable | Sound quality can vary, might not fit all gear |
This table gives you a general idea. For hiking, a rugged outdoor speaker or a good mini portable one are usually your best bets. You want something that can take a bump or two and keep the music flowing!
Attaching Your Speaker: The Simple Ways
Alright, the fun part! How do we get this speaker from your pocket to a secure spot on your body? The goal is to have it easily accessible but out of the way so it doesn’t snag on branches or fall off.
Method 1: Using Built-In Clips or Straps
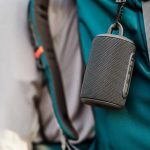
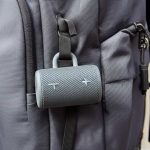
Some Bluetooth speakers are designed with hikers in mind. They come with a handy clip or a loop for a strap. This is the easiest method if your speaker has it!
Locate the Clip/Strap: Check the sides or top of your speaker. You’ll see a metal clip or a fabric loop.
Find a Spot on Your Gear: Look at your hiking belt, backpack strap, or even a loop on your jacket. You need a sturdy place where it won’t move around too much.
Attach It! Simply clip the speaker onto the fabric, or thread a strap through the loop and secure it. Make sure it’s snug!
This method is super quick. You can often attach and detach the speaker in seconds. It’s great for when you want to play music occasionally or need to quickly move it.
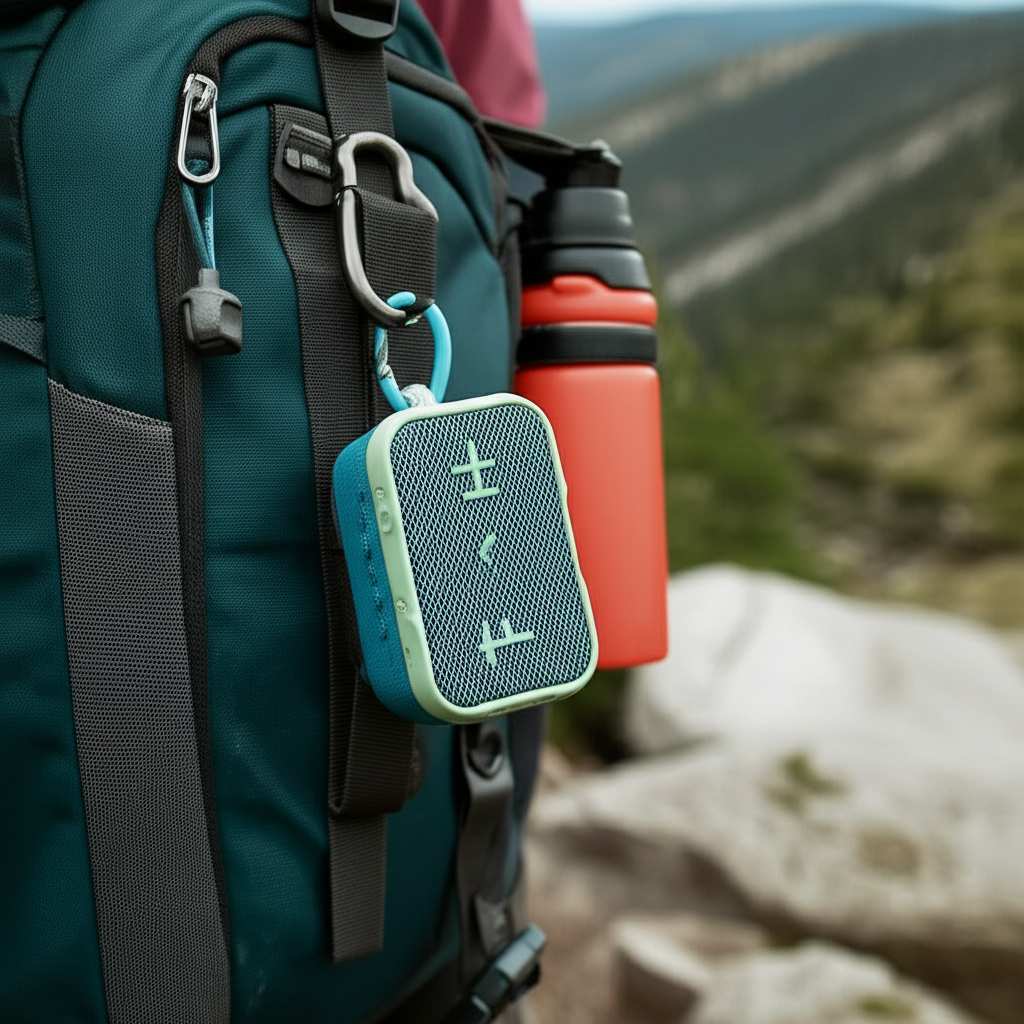
Method 2: Carabiner Power!
A carabiner is your best friend for attaching things to your gear. These little metal clips are strong and versatile. If your speaker has a strap loop, a carabiner is perfect.
Get a Carabiner: You can find these at outdoor gear stores or even online. Get a sturdy one, but not one meant for climbing – those are overkill and heavy! A small, lightweight utility carabiner works best.
Find the Speaker’s Loop: Again, look for that strap loop on your speaker.
Connect the Carabiner: Open the carabiner and loop it through the speaker’s strap hole. Then, clip the carabiner onto a strong point on your backpack, belt, or harness.
This is a really secure way to attach your speaker. It feels very solid, and you won’t have to worry about it falling off. It’s also easy to move the speaker to a different spot if needed.
Method 3: Speaker Pouches and Holders
You can also buy special pouches or holders designed for portable speakers. These often come with their own straps or carabiner loops.
Shop for a Pouch: Search online for “portable Bluetooth speaker pouch” or “speaker holder for backpack.” You’ll find options made from durable fabric.
Measure Your Speaker: Make sure the pouch is the right size for your speaker. Some are universal, while others are made for specific models.
Place Speaker Inside: Slide your speaker into the pouch. Most will have a way to secure it, like a Velcro strap or a drawstring.
Attach the Pouch: The pouch will usually have its own carabiner or loop, which you can then attach to your gear.
This method offers extra protection for your speaker, which is awesome for rough trails. It’s like giving your speaker its own little adventure suit!
Method 4: DIY Solutions (Get Creative!)
If you’re feeling crafty, you can make your own attachment system! This is where you can really personalize your gear.
Velcro Straps: Heavy-duty Velcro straps are super useful. You can wrap them around your speaker and then around a backpack strap.
Bungee Cords: A short bungee cord can work too. Loop it through the speaker’s strap hole and then secure it to your pack. Just make sure it’s not so tight that it damages the speaker or so loose that it bounces around.
Small Mesh Bag: A small mesh bag with a drawstring can hold your speaker. You can then tie the drawstring to your gear.
Remember, whatever DIY solution you choose, test it out before you hit the trail. Make sure it’s secure and won’t annoy you while you’re walking.
Where to Attach Your Bluetooth Speaker on Your Hiking Gear
Now that you know how to attach it, let’s talk about where. The best spot depends on your gear and what you find most comfortable.
On Your Backpack Hip Belt
Many backpacks have padded hip belts. These often have small pockets or loops.
Pros: Very accessible. You can easily reach your speaker to change songs or adjust volume without taking off your pack. It keeps the weight lower, which can be more comfortable.
Cons: Might bounce a bit if the belt isn’t snug. Can sometimes get in the way if you’re carrying trekking poles.
Look for a flat side pocket or a sturdy loop on the hip belt. Use a carabiner or a built-in clip here.
On Your Backpack Shoulder Strap
Some shoulder straps have loops or MOLLE webbing (those little fabric loops you see on some tactical gear).
Pros: Keeps the speaker close to your ears, so the sound feels more direct. Easy to reach without twisting around.
Cons: Can sometimes feel a bit bulky near your head. Might snag on low branches.
A small speaker with a clip or a pouch with a carabiner works well here.
On Your Hiking Belt or Waist Pack
If you use a separate hiking belt or a small waist pack, these can be great attachment points.
Pros: Excellent accessibility. Keeps the speaker secure and out of the way of your arms.
Cons: Only works if you’re wearing a belt or waist pack.
This is often the most stable spot for a speaker if you have the right belt.
On a Sturdy Loop on Your Pack
Most backpacks have a few general loops for attaching gear.
Pros: Versatile. You can choose a spot that feels balanced and secure.
Cons: Might be less accessible depending on the loop’s location.
Always use a strong carabiner or strap to make sure it doesn’t detach.
Tips for Attaching and Using Your Speaker on the Trail
Here are some extra tips to make your hiking soundtrack experience even better:
Test It Out First: Before you embark on a long hike, attach your speaker and go for a short walk. See how it feels. Does it bounce? Is it annoying? Adjust the position until it feels right.
Consider Volume: Be mindful of other hikers and wildlife. Keep the volume at a level that’s enjoyable for you but doesn’t disturb others or the natural environment. It’s good trail etiquette!
Protect It: Even with a rugged speaker, it’s wise to protect it from extreme weather. A small waterproof pouch can add an extra layer of security.
Keep it Charged: Always make sure your speaker is fully charged before you leave. A portable power bank is also a good idea for longer trips.
Secure Cables: If you’re using any cables (like for charging), make sure they are tucked away securely so they don’t get tangled.
Let’s look at some common attachment scenarios and how they stack up:
| Attachment Method | Best Gear | Pros | Cons | Speaker Type |
|---|---|---|---|---|
| Built-in Clip | Backpack strap, hip belt | Super fast, easy to use | Clip might not be universal, can be less secure on rough terrain | Speaker with integrated clip |
| Carabiner + Strap Loop | Backpack loop, belt loop | Very secure, versatile, easy to attach/detach | Requires an extra item (carabiner), loop must be present on speaker | Any speaker with a strap loop |
| Speaker Pouch | Backpack strap, hip belt | Extra protection, often has its own attachment | Adds a bit of bulk, need to find the right size | Any portable speaker |
| DIY Velcro Strap | Backpack strap, anything round | Customizable, very secure if done right | Can be fiddly to attach/detach, might look messy | Any portable speaker |
This table shows you that there’s no single “best” way. It really depends on your speaker and your hiking setup. For example, if you have a speaker like the JBL Clip 4, its built-in carabiner is fantastic for attaching directly to a backpack loop. If you have a larger speaker like a Bose SoundLink, a secure pouch with a carabiner is probably your best bet.
Did you know that some sources, like CNET, often review portable speakers specifically for outdoor use? They’ll highlight features like ruggedness and battery life, which are super important for hikers. You can find great insights there when choosing your next sound companion!
Troubleshooting Common Attachment Issues
Sometimes, things don’t go as planned. Here are a few common problems and how to fix them:
Speaker Bounces Too Much: If your speaker is bouncing around on your hip belt, try tightening the belt a little more. Or, attach it to a more stable point on your backpack. A bungee cord wrapped around it and then secured can also help dampen movement.
Attachment Point Feels Weak: If the loop on your backpack or belt feels flimsy, don’t risk it. Find a stronger attachment point. A carabiner is often stronger than a fabric loop alone.
Speaker Falls Off: This is the worst! Double-check that your clip is fully engaged, your carabiner is closed properly, or your DIY strap is cinched tight. Sometimes, the loop on the speaker itself might be too small for your carabiner; in that case, try a smaller carabiner or a different attachment method.
Remember, safety and security of your gear are key. You don’t want to lose your speaker, and you definitely don’t want it to be a distraction while you’re navigating trails.
Frequently Asked Questions (FAQs)
Q1: Can I attach any Bluetooth speaker to my hiking gear?
A1: Pretty much! The main thing is to find a secure way to do it. Speakers with built-in clips or strap loops are easiest. For others, you might need a carabiner, a pouch, or a DIY solution like Velcro straps.
Q2: Is it safe to play music on a hike?
A2: Yes, but be smart about it! Keep the volume at a level where you can still hear your surroundings, like approaching wildlife or other hikers. It’s good practice to keep it lower or turn it off in crowded areas or sensitive natural spots.
Q3: How do I protect my speaker from rain on a hike?
A3: Many outdoor speakers are water-resistant (check the IP rating!). For extra protection, especially in heavy rain, use a waterproof pouch. You can also attach it under a flap on your backpack or inside a pocket that’s less exposed.
Q4: What’s the best place to attach a speaker on my backpack?
A4: It depends on your backpack and comfort. The hip belt is often good for accessibility and balance. Shoulder straps keep sound close. General loops on the pack are versatile. Try a few spots to see what works best for you!
Q5: My speaker keeps falling off. What can I do?
A5: Make sure your attachment is super secure. Double-check clips, close carabiners fully, and tighten straps. If it’s still an issue, try a different attachment method or a more secure spot on your gear. A speaker pouch can also add stability.
Q6: How long does a Bluetooth speaker battery usually last on a hike?
A6: Battery life varies a lot! Smaller speakers might last 4-8 hours, while larger, rugged ones can go 10-20 hours or even more. Always check the product specs and consider bringing a portable charger for longer hikes.
Q7: Should I use a carabiner or a strap to attach my speaker?
A7: Both are great! Carabiners offer a very secure and quick connection if your speaker has a loop. Straps (like Velcro) can be more versatile if you don’t have a loop or want to attach to different shapes. Many people use a carabiner with the speaker’s strap loop for a strong, reliable hold.
Your Trail Soundtrack Awaits!
So there you have it! Attaching a Bluetooth speaker to your hiking gear is totally doable and can seriously amp up your outdoor adventures. We’ve covered why you might want to bring one, how to pick the right kind, and several easy ways to attach it securely to your belt, harness, or backpack.
Remember to test your setup before you head out, be mindful of others on the trail, and always keep your gear charged. It’s all about finding that sweet spot between convenience, security, and enjoying your personal soundtrack as you explore the great outdoors.
Now go forth and make every hike a little more musical! You’ve got this. Now go enjoy amazing sound and make every moment louder and better!