If your laptop webcam isn’t working, don’t panic! The quickest fix is to check if the camera is enabled and properly connected, then update your drivers or restart your device. This simple troubleshooting can solve most common webcam issues and get you back to video chatting in no time.
To troubleshoot your laptop webcam, start by ensuring it’s activated in your device settings, update or reinstall the camera drivers, and test it with different applications to identify the problem. Restart your laptop if necessary and check for any physical obstructions or dust over the lens.
A non-functioning webcam can be frustrating, especially when you need it most. Whether you’re trying to join an important video call or record a quick video, it’s essential to identify the cause quickly. Many times, the issue can be as simple as a disabled setting or outdated driver, but sometimes hardware problems or software conflicts are to blame. This guide will walk you through straightforward steps to diagnose and fix common webcam problems on your laptop, helping you stay connected without hassle.

How to Troubleshoot Laptop Webcam
Facing issues with your laptop webcam can be frustrating, especially when you need it for video calls, online classes, or recording videos. This guide will help you troubleshoot common webcam problems step by step. Whether your webcam isn’t recognized, shows a black screen, or isn’t working at all, these tips will help you identify and fix the issue quickly.
Check If the Webcam Is Properly Connected and Enabled
Many laptops have built-in webcams, but some models or external webcams require proper connection and activation. First, ensure the webcam is enabled in your laptop settings. For built-in webcams, look for a physical switch or function key that turns the camera on or off.
Verify Webcam Connection
- Ensure the camera is properly connected if you’re using an external webcam.
- Check the USB port for any loose connections or dust.
- Try plugging the webcam into a different USB port to rule out port issues.
Enable the Webcam in Device Settings
On Windows, navigate to the Device Manager to check if your webcam appears listed. If it’s disabled, right-click and select “Enable.” On Mac, check System Preferences under Security & Privacy to ensure camera access is allowed for your apps.
Restart Your Laptop and Webcam Applications
Sometimes, simply restarting your device can resolve temporary glitches. Close all applications that use the webcam, restart your laptop, and then reopen the apps to check if the camera works.
Close Background Applications
- Check for apps running in the background that might be using the webcam.
- Use Task Manager (Windows) or Activity Monitor (Mac) to close those apps.
Restart the Camera App
Close and reopen the webcam app or program. If you’re using a browser-based video call, refresh the page or reopen the browser for a fresh start.
Update or Reinstall Camera Drivers
Outdated or corrupted drivers are common reasons for webcam malfunctions. Updating your drivers can fix compatibility issues and improve performance.
How to Update Webcam Drivers
- Open Device Manager on Windows by pressing Windows + X and selecting Device Manager.
- Locate Imaging Devices or Cameras in the list.
- Right-click your webcam device and select Update Driver.
- Choose Search automatically for updated driver software.
Reinstall Webcam Drivers
- In Device Manager, right-click the webcam and select Uninstall Device.
- Restart your computer, and Windows will reinstall the driver automatically.
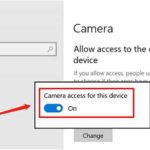
Check Privacy Settings and App Permissions
Privacy settings can block your webcam from functioning properly, especially after recent updates. You need to ensure the camera is allowed for the apps you’re trying to use.
Adjust Privacy Settings on Windows
- Open Settings and go to Privacy.
- Select Camera from the left menu.
- Ensure “Allow apps to access your camera” is turned on.
- Scroll down and verify specific app permissions are enabled for your webcam.
Adjust Privacy Settings on Mac
- Go to System Preferences and click Security & Privacy.
- Select the Privacy tab and choose Camera.
- Check the box next to the apps you want to grant camera access.
Test the Webcam with Different Applications
Sometimes, the problem is app-specific. Test your camera with various programs like Skype, Zoom, or the built-in Camera app to determine if the issue persists across all applications.
Use Built-in Camera App on Windows or Mac
- On Windows, search for “Camera” in the Start menu and open the app.
- On Mac, open Photo Booth or Facetime to test the camera.
Check for App-Specific Settings
Within each app, verify that the correct webcam is selected, and permissions are granted. Sometimes, selecting the wrong camera in app settings can cause problems.
Inspect for Hardware Damage or Obstructions
Physical damage or dirt can also prevent your webcam from working correctly. Check for smudges, dust, or cracks over the camera lens. Clean the lens carefully with a microfiber cloth.
Look for Physical Damage
- Inspect the lens for cracks or scratches.
- Make sure the camera isn’t blocked by stickers or covers.
Test the Camera Light
Many webcams have an indicator light that turns on when the camera is active. If the light isn’t on, the camera might not be working or is disabled.
Perform System Troubleshooting and Updates
Keeping your system updated ensures compatibility and fixes bugs that may cause webcam issues.
Update Operating System
- On Windows, go to Settings > Update & Security > Windows Update.
- On Mac, open System Preferences > Software Update.
Run Troubleshooting Tools
Windows offers built-in troubleshooting tools for hardware and devices. Access these via Settings > Update & Security > Troubleshoot, then select Hardware and Devices.
Check for External Factors and Compatibility
Some external webcams require additional drivers or software to function correctly. Ensure your device supports the webcam and that there are no conflicts with other hardware.
Verify Compatibility
- Review the webcam’s specifications and your system’s requirements.
- Visit the manufacturer’s website for compatibility information and driver downloads.
Disable Conflicting Software
Other applications or security software might interfere with webcam operation. Temporarily disable antivirus programs to test if they cause the issue.
Seek Professional Help When Needed
If none of the above steps work, your webcam might have a hardware defect. Contact technical support or visit a repair technician for further assistance.
Understanding how to troubleshoot laptop webcam problems involves checking connections, updating drivers, adjusting privacy settings, and inspecting hardware. Following this process can often resolve issues with minimal effort, ensuring your camera functions smoothly for all your video needs.
PC Camera not working simple solution 100%
Frequently Asked Questions
Why is my laptop webcam not detecting any devices in the settings?
Ensure that your webcam drivers are installed correctly and up to date. You can check this by opening the Device Manager, locating your webcam under ‘Imaging Devices,’ and updating or reinstalling the driver if needed. Also, verify that no other applications are using the webcam, which can prevent it from being detected in the settings.
What steps should I take if my webcam shows a blank screen during video calls?
Start by closing any other applications that might be using the webcam. Check your privacy settings to allow camera access for the app you’re using. If the problem persists, restart your device and ensure that your webcam drivers are current. Testing the webcam with another app or using built-in diagnostic tools can help identify hardware issues.
How can I resolve issues related to poor image quality from my laptop webcam?
First, clean the camera lens gently with a soft cloth to remove dust and smudges. Adjust the lighting in your environment to improve visibility. Check for any software updates for your camera driver and the app you’re using. Additionally, access camera settings to increase brightness, contrast, or resolution for a clearer image.
What should I do if my webcam is disabled in Device Manager?
Open Device Manager and locate your webcam device. If it appears disabled, right-click on it and select ‘Enable device.’ If it’s missing or has a warning icon, reinstall the driver or update it directly from the manufacturer’s website. Restart your computer afterward to apply the changes.
How can I troubleshoot hardware issues if my webcam still doesn’t work after software fixes?
Test the webcam with different applications to rule out software conflicts. Check for physical damage or loose connections if your laptop allows hardware access. If external, try connecting it to another computer to determine if the hardware is faulty. If problems persist, consider consulting a professional technician for repairs or replacements.
Final Thoughts
To troubleshoot laptop webcam, start by checking the device drivers and ensuring they are up to date. Restart your laptop and test the webcam with different applications. If issues persist, verify permissions and privacy settings. Additionally, inspect hardware connections or consider updating your operating system. Knowing how to troubleshoot laptop webcam helps resolve common problems quickly and efficiently, keeping your device functional.