To connect a VPN through your router, simply access your router’s settings, configure the VPN client with your VPN provider’s details, and enable it. This way, all devices connected to your network automatically benefit from VPN protection without individual setup. It’s an efficient solution to secure your entire home or office network seamlessly.
Connecting a VPN through your router can seem daunting at first, but once you understand the process, it’s a game-changer for online privacy and security. Instead of configuring each device separately, setting up the VPN on your router encrypts all internet traffic at the source, saving time and effort. Whether you’re protecting your family’s online activity, bypassing geo-restrictions, or ensuring safer browsing, configuring your router for VPN use is a smart move. This guide walks you through the steps in a straightforward way, helping you turn your existing router into a powerful security tool without needing any advanced technical skills.

How to Connect VPN Through Router: A Complete Guide
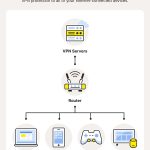
Connecting a VPN through your router is a smart way to protect every device in your home. Instead of setting up a VPN on each device individually, you only need to configure it once on your router. This method saves time and ensures all your internet traffic is secure.
Understanding Why You Should Connect a VPN Through Your Router
Many people use VPNs to protect their privacy online. When you connect your VPN directly to your router, it covers all devices connected to the network. This includes smartphones, tablets, gaming consoles, and smart TVs.
Another benefit is bypassing device restrictions. Some devices do not support VPN apps. Routing through your router solves this problem easily.
Plus, it helps to hide your IP address from websites and hackers by encrypting all data traffic at the source. This setup is perfect for those wanting seamless security without installing multiple VPN apps.
Prerequisites for Connecting VPN to Your Router
Before starting, gather everything you need. First, ensure your router supports VPN connections. Not all routers have this feature, so check the device specifications.
You will also need a VPN subscription from a reliable provider. Make sure your VPN supports manual configuration via protocols like OpenVPN or L2TP/IPsec.
Lastly, have your VPN server details ready, including username, password, and server addresses, provided by your VPN service.
Choosing the Right Router for VPN Connection
Not every router is suitable for VPN setup. Look for routers with a flashing firmware that supports VPN configurations such as DD-WRT, Tomato, or Asuswrt-Merlin.
High-performance routers with faster processors handle encryption better, ensuring a smooth VPN experience. Routers with dual-band capabilities can also improve network stability.
If your current router lacks VPN support, consider upgrading to one designed for VPN use or installing custom firmware that opens options for manual setup.
Step-by-Step Guide to Setting Up VPN on Your Router
Step 1: Access the Router’s Admin Panel
Connect your computer or device to the router via Ethernet or Wi-Fi. Open a web browser and type your router’s IP address, usually 192.168.1.1 or 192.168.0.1.
Login using your admin credentials. If you don’t know them, check your router’s manual or look for a sticker on the device.
Step 2: Find VPN Settings
Navigate to the VPN section of your router’s interface. This location varies by manufacturer, but it is often under “Advanced,” “Network,” or “VPN” tabs.
If your router doesn’t have built-in VPN options, consider flashing it with firmware like DD-WRT or Tomato first.
Step 3: Configure VPN Settings
Input the VPN server address, your VPN username, and password. Select the protocol compatible with your VPN provider, typically OpenVPN or L2TP/IPsec.
Download configuration files from your VPN provider if needed, and upload or input the details as instructed.
Step 4: Save and Connect
Once all settings are correctly entered, save the configuration. Enable the VPN connection and verify it is active by checking your IP address through a browser.
Advanced Tips for Optimal VPN Router Setup
Using Static IP Addressing
Assign a static IP to your router to prevent IP conflicts. This helps in maintaining a stable VPN connection.
Setting Up a Kill Switch
A kill switch automatically disconnects your internet if the VPN drops. This feature is vital for maintaining privacy and should be enabled if available.
Configuring DNS for Privacy
Use DNS servers provided by your VPN to prevent DNS leaks, which can expose your browsing activity.
Implementing Firewall Rules
Set firewall rules to prevent data from bypassing the VPN, ensuring all traffic remains encrypted and protected.
Troubleshooting Common VPN Connection Issues
If your VPN doesn’t connect, check your username and password. Make sure the server address is correct and that your firmware supports the VPN protocol you chose.
Sometimes, resetting your router or updating firmware fixes connectivity issues. Also, confirm your VPN provider isn’t experiencing outages.
If connection problems persist, contact your VPN’s support for assistance with specific configurations or troubleshooting steps.
Additional Tips for Securing Your Network
Always change your router’s default admin password to prevent unauthorized access. Use strong, unique passwords for your VPN account as well.
Keep your router’s firmware updated regularly to patch security vulnerabilities and improve performance.
Disable WPS and UPnP features if not needed, as they can introduce security risks.
Benefits of Routing All Devices Through a VPN
All traffic, from streaming services to smart home devices, becomes encrypted and more private. This setup also prevents network-based restrictions and censorship.
It simplifies management since you only configure the VPN once on the router. As a result, you get continuous protection without manual app configuration on each device.
Lastly, it can help improve online security, especially when using public Wi-Fi or unsecured networks.
Related Topics to Explore
- Best VPN protocols for router setup
- How to choose a reliable VPN provider
- Understanding VPN encryption methods
- Router firmware options for VPN support
- Setting parental controls and security rules with VPN
Connecting your VPN through the router may sound technical initially, but with clear steps, it becomes manageable. It offers a convenient way to enhance your online privacy, secure all your devices, and bypass restrictions easily.
How to Setup VPN on Your Router (easy, step-by-step tutorial!)
Frequently Asked Questions
What are the key steps to set up a VPN connection on my router?
Setting up a VPN on your router involves accessing your router’s admin panel, entering the VPN provider’s configuration details, and enabling VPN services on the device. First, log into the router’s dashboard using your web browser. Navigate to the VPN or WAN settings, then input the server address, username, and password provided by your VPN service. Save the configuration and reboot the router if necessary. Once configured, all devices connected to the router will benefit from the VPN connection automatically.
How can I ensure my VPN connection remains stable through the router?
To keep your VPN connection stable, start by choosing a reliable VPN provider known for consistent performance. Use a wired connection for better stability if possible. Optimize your router’s firmware by updating it regularly to fix bugs and improve functionality. Adjust VPN protocol settings—such as switching between OpenVPN or IKEv2—to find the most stable option for your network. Additionally, avoid high network traffic periods and limit bandwidth-consuming activities to maintain a steady connection.
Are there specific routers compatible with VPN configurations, and how do I identify them?
Many routers support VPN configurations, but not all do out of the box. Check your router’s specifications or user manual for VPN support. Routers compatible with VPN features often mention support for protocols like OpenVPN or PPTP. Popular brands such as Asus, Linksys, and Netgear frequently offer models with built-in VPN functionality. If uncertain, visit the manufacturer’s website or contact customer support to verify compatibility before purchasing a router for VPN setup.
What should I do if I encounter connection issues after setting up VPN on my router?
If you experience connection problems, first verify the VPN credentials and settings entered into the router are correct. Restart the router to apply changes properly. Check if the VPN server you’re connecting to is operational by testing with other devices or services. Ensure your firmware is up to date, as outdated software can cause connectivity issues. If problems persist, consult your VPN provider’s support resources or consider resetting your router and reconfiguring the VPN setup carefully.
Final Thoughts
Connecting a VPN through a router simplifies secure browsing for all connected devices. First, access your router’s admin panel and find the VPN settings. Input your VPN provider’s details, then save and reboot your router.
Ensure your VPN configuration is correct to avoid connection issues. Testing the connection verifies that your devices now benefit from enhanced privacy.
In conclusion, knowing how to connect VPN through router ensures seamless security across your network. This setup protects multiple devices efficiently, saving time and effort.